30 June, 2009

Bourbon Biscuits - Homemade Heaven

Countdown Begins ~ Count 23

...Bourbon Biscuits spells out the
Chocolate
the
Celebration
The two rectangular pieces of chocolate brown biscuits. The chocolate filling, the middle layer is like the glue that holds the two rectangular pieces of biscuits together. Colour wise, the biscuits are slightly lighter and the filling slightly darker. Each biscuit with ten holes arranged in five pairs on outer surface breathing. The biscuits has little sugar crystals sprinkled on the upper surface which counts as extras.  Yes! It is the deliciously darling the best the Bourbon Biscuit.


I'm too fond of only chocolate bourbon biscuit, – though I'm  not sure why, exactly. Perhaps, maybe it has to do something with my body sugar that rushes whenever I eat Bourbon biscuit. Making me feel rejuvenated in a micro second. Indeed its like having a Heaven in my mouth with every little Bites of Bourbon Biscuits..Yummm...!
I have been a strict regular bourbon biscuit eater ever since my childhood. "Perhaps perfectly proven possible way to eat Bourbon Biscuits in the deconstruction list manner that is consuming the separated layers of the biscuits and digging all the fillings inside it."

During my childhood, knowing my fondness for the bourbon, my dear Paa used to bring a whole big tin of bourbon biscuits. My mom used to ask me to eat three biscuits each day as she knew it is simply impossible to stop eating bourbon ones you start. I obeyed the instructions but as always with some changes in the rules. I for sure ate three biscuits as per instructions but at least four times a day. And even this is not just enough for me. I still follow the same rule for the bourbon. Ones the bourbon packet is open it has to be finished..!

But I’m more excited as I recently made my very own favorite bourbon biscuits at home. Except the process of baking, which takes less than 15minutes this one is an easiest sweet stuff to make. My homemade bourbon biscuits taste likes the ones from the shop. I’m sure you will enjoy making and eating it. .

Ingredients for Bourbon Biscuits:
Ingredients for Bourbon Biscuits
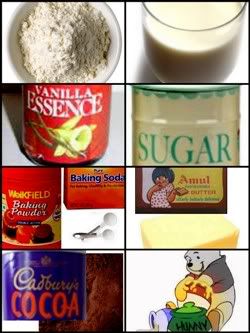
  • All Purpose Flour/Maida – 1 cup
  • Butter – ¼ cup
  • Sugar – 1/3 cup
  • Baking Soda – 1/4tsp
  • Baking Powder – 1 tsp
  • Cocoa – 3 tsp
  • Vanilla Essence – 2tsp
  • Cold milk – 3-4 tbsp
  • Honey – 1tsp(optional)
Ingredients for the Filling (Butter icing):
  • Butter – 1/4cup
  • Icing Sugar – 1/3 cup
  • Cocoa – 1 tsp
  • Vanilla Essence – a few drops


Method for making bourbon biscuit:

making Bourbon
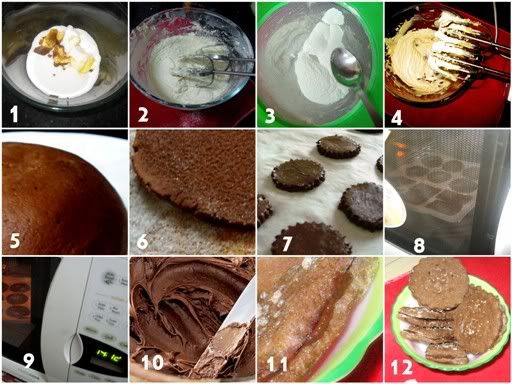
  • Take a bowl and add the butter and sugar and beat them till light and fluffy.
  • Add vanilla essence, honey and Baking Soda and blend well.
  • Sieve the Flour with Cocoa and baking powder. Mix the Flour to the creamed mixture and form soft dough.
  • Now, add cold milk to this dough. Roll out the prepared dough on a board.
  • Cut with a biscuit cutter in shape.
  • Prick on top of the cut shapes with a toothpick and sprinkle sugar.
  • Place on a greased and floured baking tray and bake at 160C for 10-15 mins.
  • Cool it for 2mins before using the filling/icing.
Method for the filling:
  • Mix all the filling ingredients to a smooth paste.
  • Sandwich the biscuits with this chocolate butter icing.
Note:
  • Castor Sugar is prefered in this recipe.
  • While rolling the prepared dough on a board  use a little flour for dusting, so that the dough does not stick at the bottom.
  • I made rectangle shapes with the knife and other round shape with the biscuit cutter.
  • In the baking tray, you may also use butter-paper.
  • This recipe shall make around 14-16 bourbon biscuits all together.
  • To enhance the flavor of the filling/icing of the biscuits, you may add 1 tsp coffee essence or 1/2 tsp instant coffee dissolved in 1 tsp water.
  • Countdown Begins-Celebrate Life , COUNT~23 with the Bourbon Biscuits.


Read More »

26 June, 2009

Hubby Style - Taro/Arbi Masala Fry

Yes! My hubby cooks. And what an irony! He can cook all that I can’t. Infact, he loves all those vegetables which I don’t like very much to eat. However when, he cooks anything like that, he somehow convinces me to taste it and then I end up just appreciating his cooking skills. Indeed, he is really good cook. It’s usually the weekends when he innovates and rejuvenates in kitchen making something.

Last Sunday he tried his hand in making arbi/arvi/taro roots. With almost only the basic spices nothing extra, he made those ugly arbi into hot spicy delicious looking recipe. And when asked for the name of the recipe, he in a very lavishing loud way said, it is “Arvi Masala Fry”.

He is quite fussy in adding the specific spices. This excessive attention creates his own very personal homely tastes in anything he cooks.
Like me, He also does not like anybody entering the kitchen and interrupting him when he is cooking. Despite that, I somehow managed to take few good pictures to add in this post. This recipe is quite easy to prepare and best part of this recipe is that one who doesn’t like to eat taro roots, will also appreciate the flavor. Hope you will enjoy!

Arbi Masala Fry

So let’s start with some basic facts of taro roots and followed with the recipe directly from hubby.

Taro root is starchy tuber vegetable much like a potato. It has its native to Asia and grown extensively in the Pacific. Taro roots have its estimates in cultivation in wet tropical India before 5000 B.C. In North India, it is called Arvi or Arbi. In Assamese it is called Kosu. In Bengali the root is called gath and the plant is called Kochu. In Kerala, a state in southern India, taro corms are known as Chembu-kizhangu. It is used as a staple food, as a side dish, or as a component in various side dishes.
Recipe “Arvi Masala Fry”:

IngredientsIngredients:
  • Taro Root (arbi): 4-5
  • Ginger-Garlic paste: 1 tsp.
  • Garlic pods: 10-12 nos.
  • Tomato Puree: 1 tablespoon
  • Turmeric powder: 1/4 tsp
  • Chilly powder: 1 tsp
  • Coriander powder: 2 tsp
  • Cumin seeds: 1/4 tsp
  • Salt to taste
  • 2 Tbs oil
  • Red chili flakes for garnish


Prepartion of Arvi MasalaMethod:
  • Boil the taro root in water for about 10-15 minutes until barely tender when pierced with the knife. It should be firm and not too mushy.
  • Then take out of the hot water and cool enough to handle, trim the ends and remove the skin. Cut them into chunks or small cubes.
  • Now deep fry the taro chunks/ cubes until golden brown. Strain them and keep aside.
  • Now take the dry spices powder (coriander, red chili, salt, turmeric) in a small bowl and add the tomato puree and little water to make it a thick paste. Leave it aside.
  • Take the garlic pods, crush them and finely chop them.
  • Than, heat oil in a pan, add the cumin seeds let it spatter.
  • Now add the fine chopped garlic. When, the garlic turn golden brown, add the ginger-garlic paste. Stir it. Cook for a minute and then add the spice paste and let it cook until it leaves the oil.
  • Pour half a cup of water, if spices stick the bottom of the pan.
  • Now add the fried taro chunks /cubes in the pan. Carefully stir them and cook them in low flames until dry and golden brown.
  • Garnish with red chili flakes. Serve with rice or chapati.
NOTE:
  • Boiling the taro roots, reduces the cooking time.
  • Frying the chunks/cubes of the taro roots makes more delicious and a very specific rough taste of the arvi/taro roots is gone.
  • You can also add the fresh lemon juice to enhance the flavors of the gravy.
  • This recipe was made last weekend, you can try this coming weekend :)
Read More »

20 June, 2009

recipe for lazy man - Onion Paratha

Few days back, I was talking to one of my very close friend, and I asked her if she knew any easy dish, that I could make. She suggested me a dish. Now this simple dish, reminded me how my mom too make in the morning for me during my school days. Indeed, sometimes simple dishes can taste so delicious.

Moreover, ever since I made the Methi-thepla and khichiri, many of my friends said that it good to see the recipes which are so easy and quick to make yet tastes delicious. I’m fully charged and want all my still bachelor friends and the guys who’s wife is not at home to make their hands a bit dirty and surprise themselves or their wife with a little of cooking. Of course, cooking is fun and easy if one really puts some thought over it. One of my friends did try his hand making the khichiri recipe; reading my blog and he realized that he can cook but he needs some more good practice in cooking.
As the perfect quote goes, Never leave Hope in dismay, until dismay leaves you”. So, never leave the Hope in cooking even if your kitchen turns into smoke and mess. Believe me, the moment it’s a mess, you will learn from the mistake and next time, the best you will perform ever since then.
That what philosophy works with me, and I end up discovering a new dish. I’m no more scared of cooking rather I enjoy in my own with all the simple and longs recipes. Some recipes, are directly from my mom’s mouth, some through 24/7 brows and some from the mess I make in the kitchen.


Onion Paratha|Indian Bread


So if you are a bachelor or missing your mom's cooking like anything, or you are simply a lazy-man or you are in a hurry and are hungry, you will surely like to go through this very quick and easy recipe and enjoy cooking for either for yourself or your friends. Avoid being lazy and eating a just a burgers or potato chips. You can be lazy still eat healthy by trying this easy and simple recipe. The best part of this recipe is that you will find all the ingredients at home and none of the ingredients which are seasonal. So, enjoy making the Onion Paratha, hitting anytime the corner of the year.

However, what I enjoy the most about the onion paratha, is the combination of the crispiness of the paratha/bread and the sweet crunchy texture of the fine chopped onion in between of every bite I take.
Ingredients for Onion Paratha:
  • Whole wheat flour: 1½ cup (Shall make 6-8 paratha)
  • Onion: 1-2 (finely chopped)
  • Turmeric powder: ¼ teaspoon
  • Red chilly powder: ¼ teaspoon
  • Coriander (dhania) powder: ¼ teaspoon
  • Salt to taste
  • Oil for making parathas
  • Carom (Ajwain) seeds: ½ teaspoon
  • Anise seeds (Choti Saunf): ½ teaspoon
  • Cumin (jeera) powder: ¼ teaspoon
  • Curd/yogurt: 2 tablespoon (optional)

Making of Onion Paratha

Making of Onion Paratha:
  • Roast the carom, anise, and cumin seed in a pan. Let it cool down and then roughly crush them into powder.
  • Fine chop the onions.
  • Now take the wheat flour, and add the fine chopped onion, with all the spices powder, roasted seeds powder and salt. Mix it well.
  • Add a table spoon of oil. Than add water slowly to knead to make a nice smooth dough. You may use around ½ cup of water. The dough shall be smooth and soft.
  • Cover and leave the dough with a tissue/cloth and set aside for about 5-10 minutes (if in hurry, than no need to set aside)
  • To make paratha/flatbread, divide the dough into balls. Take the size large as of a large lemon. Take a ball, dust with flour and roll out to a flat thin disc.
  • Heat a tava/pan (griddle). When well heated, place a paratha on the tava. Roast on medium flame both sides using the oil. Please refer to the link (Paratha-Indian Bread).
  • Serve hot. Enjoy with roasted green chilies (recipe below.)

Ingredients for Roasted Green chilies:
  • Green chilies: 2-4
  • Salt: 4-5 spoons
  • Oil: 1 tablespoon

Making of Roasted Green Chilies

Method of making roasted Green chilies:
  • Wash the green chilies in water.
  • Now make a long slit in the chili.
  • Ones slit is made de-seed the green chilies. That means, remove all the seeds from the green-chilies with the help of the sharp knife.
  • Now rub the salt outside and inside the green chilies.
  • Leave the green chilies with the salt rubbed for about 10 minutes or more.
  • Than take a small pan and heat oil. Add the green chilies and roast the chilies from both the sides.
  • It will take just a micro second for the green chilies to turn a bit brown. Soon, remove them from the pan and keep aside.
  • Add again the salt on the roasted chilies and serve with the paratha or like any thing as a spicy side dish.

Note:
  • To make the onion paratha, soft, add two tablespoon of curd while making dough.
  • Add the spring onion leaves if available to enhance the taste.
  • Adding the roasted seeds is optional and can add them directly.
  • You might also like to add the gram flour 1tablespoon with the flour while kneading to add flavor.
  • Salt is believed to dilute the strong bitter flavor of the chilies.
  • Add few drops of water, if the green chilies starts burning.(Be careful of the strong smoke)
  • Active your senses and add the ingredients according to your flavor.
Read More »

17 June, 2009

Biryani - a perfect one-dish meal

Few days back, I made Khichiri, the rice preparation which takes no time to prepare. Here is one more rice-preparation, the Chicken Biryani which is quite a lengthy process but totally worth. This makes the perfect one-dish meal which is aromatic delicious and fabulous dish.
Biryani, is a Mughlai dish where the rice is cooked separately from the other ingredients.
The par boiled rice, which is then assembled with the other ingredients, sealed and put on "dum" (put on a very low heat, so that all the flavors inside the pot amalgamate well) for some time.
The good quality of basmati rice used gives the best flavor and appearance. The key to making a good biryani lies in the way you par boil the rice. Never over cook the rice. Most expensive spice used is the saffron. For me the fresh mint leaves creates the magic, for you, any of your favorite other spice can do. Try making it for your loved ones.
Believe me, Making yourself the Biryani and eating it will surely be the most cherishing experience of your life.
This recipe will easily serve 2pax.
So lets us begin.

TOTAL Ingredients for Chicken Biryani:
  • Chicken – 1 Boneless Breast, 2 drum-sticks
  • Basmati rice – 2 Cups
  • Onions - 1 cup (finely chopped)
  • Ginger and Garlic paste - 2 tablespoon
  • Red Chili Powder – 3 tablespoon
  • Turmeric Powder- 2 tablespoon
  • Coriander Powder – 3 tablespoon
  • Bay Leaves - 3-4 Nos.
  • Cloves – 4-5Nos.
  • Cinnamon Sticks- 2 cm long
  • Green Cardamom Pods- 3 or 4 Nos.
  • Black Cardamom Pods- 2Nos
  • Cumin – 1- 2 teaspoon
  • Mace – 2 (full-mace strands).
  • Cashew nuts - 10-12Nos.
  • Raisins- 10-15 Nos.
  • Mint Leaves – 1cup
  • Garam Masala Powder - 2 teaspoon
  • Salt - (according to taste)
  • Ghee (clarified butter) – 3 tablespoon
  • Curd - ½ cup
  • Oil – 5 Tablespoon
  • Saffron - few strands

Chicken Biryani @ Humming Today

For your convenience, the whole recipe of Chicken Biryani is divided into major 4 procedures with picture illustration which is as follows:-
  1. Marinating the Chicken,for making Biryani.
  2. Preparation of the Rice for making Biryani.
  3. Mixing the two sums of ingredients two (1, 2) above,and named as mentioned Making of Biryani
  4. Garnishing, the Biryani.

PROCEDURE: 1.
Marinate Chicken
Ingredients from the above mentioned list; for Marinating the Chicken:

  • Chicken- 1 Boneless Breast, 2 drum-sticks.
  • Ginger and Garlic paste- 1 tablespoon.
  • Red Chili Powder- 1 teaspoon
  • Turmeric Powder- 1teaspoon
  • Coriander Powder- 2 teaspoon
  • Garam-Masala Powder - 1 teaspoon
  • Cloves - 3 Nos.
  • Cumin – 1teaspoon
  • Mace – 1 full-mace strands.
  • Salt- 1½ teaspoon
  • Oil – 1tablespoon
  • Curd - ½ cup 
Preparation for Marinating the Chicken:
  • Take the chicken breast and cut into small pieces. Make cuts on the leg-piece(drum-stick).
  • In a bowl and mix all the ingredients and spicies with the chicken, cover it and keep aside for 1 hour for marinating.

PROCEDURE: 2.

Rice PreparationIngredients from the above mentioned main list, for Rice Preparation:
  • Basmati Rice- 2 Cups
  • Water- 5-6 Cups
  • Oil- 1 tablespoon
  • Bay Leaf- 1Nos.
  • Cloves – 3Nos.
  • Cinnamon Sticks- 1cm long
  • Cardamom Pods- 2 Nos. (crushed)
  • Mace – 1(full-mace strands)
  • Salt- 1tablespoon
Preparation of Rice for Biryani:
  • Take Rice and soak them into water for about ½ an hour. And strain the rice and keep aside.
  • Add 5-6 cups of water with all the spices and set it to boil. Don’t forget to add the Salt.
  • Ones the water starts boiling, add the Soaked Rice. Cook the rice only half done.
  • When rice is half done, remove it from the heat and strain and keep them aside.

PROCEDURE: 3. (combining the 1 and 2)
Making of BiryaniFinal Procedure for Making of Biryani:
  • Take thick bottom Vessel /utensil and heat 3 tablespoon oil.
  • Add the remaining dry spices like cloves, cardamom, bay leaves, mace, cumin seeds, Cinnamon Stick.
  • When the spices start to sputter, add finely chopped onion and let it turns glossy.
  • Add the 2 teaspoon ginger-garlic paste and cook for a minute.
  • Then add the fine chopped tomatoes and let them cook.
  • Mix them well and add other dry powdered spices like coriander, turmeric, red-chili, garam-masala powder and salt.
  • Also add the fine chopped mint leaves.
  • When the spices are cooked, it leaves the oil.
  • Then add the marinated-chicken pieces and ½ a cup of water and cook the chicken with the lid closed. Chicken pieces should look roasted.
  • Keep stirring in between.
  • Ones the chicken is well cooked, check and add ½cup of water if it is very dry or the spices are sticking the bottom. Lower the flame.
  • Now take out half of the chicken in another bowl.
  • Than add the par-cooked Basmati Rice into the vessel/utensil just above the cooked chicken. Spread the rice into a layer. Add only half of the total rice.
  • Now over the rice add the remaining chicken, which was taken aside. Spread on the rice nicely.
  • Also add few thin strands of the ginger in between the layers of the chicken and rice.
  • Latter fill the vessel/utensil with other remaining rice over the chicken and spread. Repeat this process making layers of rice and chicken.
  • Then add over the Rice, (garnishing ingredients metioned below in PROCEDURE.4) the golden fried cashew nuts and raisins with the ghee. Also pour the saffron dissolved -coloured milk over the rice.
  • Close the Vessel/Utensil, with the air-tighten lid. And cook again on the medium-heat for couple of minutes and then on low-heat for 5-10 minutes.
  • After being cooked, don’t open the lid for about 10-15 minutes, let it aroma mix well and settle.
  • Serve hot, with the side-dish like Raita (spices curd) or plain curd, onion rings, and lemon wedge.
PROCEDURE: 4.

Garnish Biryani
Ingredients from the above main list for Garnish in Biryani:
  • Cashew Nuts
  • Raisins
  • Onion (cut into round thin rings)
  • Mint Leaves
  • Saffron (dissolved into warm milk)
Procedures for Making the Garnish for Biryani:
  • Head the ghee in the pan. Fry the cashew nuts till golden brown. Also fry, the Raisins and keep aside in the cup. Add the remaining ghee in the bowl from the pan.
  • Cut in rings of the Onion and keep aside. Take the warm milk, add the strands of saffron and keep aside.


NOTE:
  • You can use all the Ghee (clarified butter) intead of Oil for more aromatic flavor.
  • I prefer the boneless chicken, you can have any piece of Chicken or add mutton pieces as you relish. If vegetarian, you can add the number of vegetables of your choice and follow the same procedure. Marinate the chicken, poking the chicken with the fork and rub the spices. For much flavored marinate the chicken prior 2-3 hours.
  • Keep ready the marinated chicken and the soaked rice ready prior making the biryani.
  • If you are expert you can cook the semi-cooked rice, simultaneously when the chicken is being cooked in the Vessel/Utensil. I prefer cooking one thing at a time for no latter confusion and hassle. Also I keep the semi-cooked rice vessel in the big vessel half filled with the cold water (something like double-boiler pan), so that the rice does not get cooked with the steam while I’m busy preparing the chicken in the Utensil.
  • Keep your garnishing ingredients ready prior starting any main procedure.
  • One can also take a few semi-cooked grains of rice and colour them with diluted saffron for garnishing. One can also add the fresh green coriander leaves every time the mint leaves are added.
  • You will need a utensil of about 12" (300 mm) base, I prefer Pressure Cooker. You can also add the deep fry half the sliced onions to golden brown with ginger strands while layering the rice and chicken.
  • Lid the vessel/utensil and try making it airtight (but no pressure should build up). So one can keep the clean wet kitchen towel covering the opening of the vessel and over it the lid was placed. This shall keep it air-tight. Also you have to take care that the biryani being whole cooked must not get burnt from the bottom after been air-tighten. The flame must not get concentrated only at the center of the vessel after been air-tight; one can keep the vessel on the hot flat-pan/tawa already placed on another burner with the low flame.
Hope you enjoy making and relishing the recipe, the Biryani!
Read More »

10 June, 2009

simple recipe - Khichidi

It’s fascinating to try new dishes that consists fusion of tastes. But when it comes to comfort-cooking, standard recipes and traditional dishes are some of the best choices to make.

India consists of vast variety of cuisines. Different states of India have different cuisines. There are some dishes which often we find in common recipes with few different ingredients. We call them with different names but the basic recipes are same.

It’s interesting to see the similarities between the varieties of cuisines of different places. 
I get amazed every time when I find same strange similarities between the cuisines of two corners of the world, the East and the West.

Last time, comparing in my previous post the very traditional Theplas of Gujarat with the Tortillas, the explorations did not ended there. Here, for you a very strange similarity between the dish of the India and Europe.
We call it with many names like khichde / khicheeri / khichuri (Bengal,Assam) / Vaghareli Khichdi (Gujarat) / Pongal (South India) / Huggi (Karnataka) / khichra (Pakistan) and you call it Porridge or Kedgeree.

Khichdi
Here, is a very strange similarity in the ingredients and the process of making between the Khichidi of India and Porridge, Kedgeree of West of the world.
Porridge as the traditional breakfast of Scotland it is made with salt. Porridge was a traditional food in much of Northern Europe back to antiquity. Barley was a common grain used, though other grains and yellow peas could be used, depending on local conditions. Porridge was primarily a savory dish, with a variety of meats, root crops, vegetables, and herbs added for flavor.
Porridge could be cooked in a large metal kettle over hot coals, or heated in a cheaper earthenware container by adding hot stones until boiling-hot. Porridge is one of the easiest ways to digest grains or legumes. It is also commonly eaten by athletes training for their events, and it is done that way in road running. It is traditionally in many cultures eaten as a food to nurse the sick back to health. Ref. Wikipedia


" Kedgeree (or occasionally kitcherie, kitchari or kitchiri) is a dish consisting of flaked fish (usually smoked haddock), boiled rice, eggs and butter. According to some sources, the dish originated from Scotland and was taken to India by Scottish troops during the British Raj, where it was adapted and adopted as part of Indian cuisine." Ref. Wikidedia

  • Khichidi:
Khichdi is just rice cooked with some spices and optional vegetables. It is very simple to make and can be cooked without much effort. Khichidi made with moong dal is believed to get easily to digest. Khichri itself can be served as a meal which really doesn't need any side dish.


It is also to be believed that Khichri have a very long history, way back to the 15th century to have come and stustained from the Mughals in India. Khichdi was very popular with the Mughals, especially Jahangir. Ain-i-Akbari, a 16th century document, written by Mughal Emperor, Akbar’s vizier, Abu'l-Fazl ibn Mubarak, mentions the recipe for Khichri, which gives seven variations.Ref. Wikipedia


Khichri ingredientsHence, Khichri loaded with enormous history lead me to my simple, effortless, light and nutritious dish, cooked in little oil. It also reminds me the days in Guwahati(Assam), where I enjoyed eating khichiri at Saraswati Puja ceremony.

My variant of khichri recipe is without vegetables but full of protein in the form of lentils. Take any lentils to add, Khichidi is indeed a great combination of carbohydrates and protein.Next time when you are in the hurry, try making this nutritious and less spices dish. I have fixed this recipe in my menu, at least ones a week. Hope you enjoy making it.

INGREDIENTS:

  • Green whole moong dal - ½ cup
  • Urad Dal - ¼ cup
  • Yellow(Ahar dal) lentils – ¼ cup
  • Basmati rice – ¾ cup
  • Jeera Rice- ¼ cup
  • Green Chilli- 1 Nos.
  • Garlic Flakes – 5-6 Nos.
  • Salt - 1 teaspoon (according to taste)
  • Turmeric - 1/4 teaspoon
  • Red chilli Powder- ½ teaspoon
  • Coriander Power- ½ teaspoon
  • Oil-1 tablespoon
  • Ghee (clarified butter)- 2teaspoons
  • Water- to pressure cook
PREPARATION:
  • Wash the rice and lentils in water for a couple of times. Than soak them in water for 10-15 minutes. And keep aside rinsing it.
  • Then fine chop the green chili and crush roughly the garlic.
  • Now add oil in the pressure-cooker and heat it.
  • Add the garlic in the hot oil and sauté till golden brown.
  • Than add the rinsed rice and lentils in the cooker and sauté for a minute.
  • Now add the chopped green chili and other powdered spices, including the salt. Mix it well.
  • Now add the sufficient water into the pressure cooker and cover with the lid. Cook it for 2-3 whistles.
  • After whistles done from the pressure cooker, remove it from the heat and let it rest for couple of minutes.
  • Serve hot. Add ghee over it and enjoy with pickle, or curd, or papad or any sauté vegetables.
Method to make Khichidi


NOTE:
  • Instead of oil, ghee can also be used.
  • I enjoy eating the yellow lentils so, I have added. Yellow lentils is optional.
  • Urad dal gives smoothness to the khichidi.
  • Where as many or as less lentils or vegetables you add shall only make it much delicious and nutritious. It’s all about enhancing your taste-buds and adds the ingredients accordingly.
  • Green chili is optional. But definitely in this particular recipe of khichidi, Garlic is compulsory.
  • If you don’t have a pressure cooker, then a small vessel can be used to cook.
  •  I prefer to add 2 cups of water to one cup of rice. So in this particular recipe, I have added 4 cups of water.
  • I enjoy adding different types of rice to match up to my choice favors. So, I suggest you too to play with the ingredients to create variations in aroma and flavor.
Read More »

06 June, 2009

Thepla or Tortilla - you decide

Recently, I was reading an article on Tortillas and I found, there is so much of similarity between the Tortillas and Indian flat bread. Well, Tortillas are a staple food in Mexico and Central America and have a very long traditional history.

Tortillas are round, thin, flat bread of Mexico made from unleavened cornmeal or, less commonly, wheat flour. The grains were ground on a stone saddle quern. Small pieces of dough were patted by hand into thin disks. The tortilla was then baked on a, a griddle of earthenware or iron. Tortillas stale quickly and are usually bought fresh daily or even for each meal. Ref. Encyclopedia Britannica.
Somehow, all this reminded me of Thepla. Indeed, Thepla or any Indian Bread is similar to a flour Tortilla in appearance. Thepla are round, thin, flat bread of Gujarat made commonly with wheat flour like tortillas of Mexico.
I have always loved the bitter taste of (Methi) the fenugreek leaves. And when it comes to Thepla , Methi- Thepla is my favorite. It is rich nutrition and flavor. I can eat it in breakfast or in lunch or even in evening with tea. Actually, anytime for Thepla! The best thing about Thepla is that one can enjoy eating it either warm or cold. Thepla is always a delight making and eating it.

I am sure you will also enjoy making and relishing it. Thepla is one of the easiest dish’s to prepare with all the ingredients easily available at home. So enjoy.

Indian Bread-Thepla
CLICK picture to Enlarge:

  
Methi Thepla / Indian Flat Bread / Indian Fenugreek Tortillas Recipe.  

INGREDIENTS:
  • Fenugreek (Methi) leaves : about half a bundle or 2 handfuls.
  • Whole wheat flour : 1½ cup (Shall make 6-8 thepla)
  • Chickpea flour (besan) : ½ cup
  • Curd/yogurt : 2 tablespoon
  • Green chillies : 2-4 (According to Taste)
  • Garlic Pod : 6-7
  • Turmeric powder : ¼ teaspoon
  • Red chilly powder : ¼ teaspoon
  • Coriander (dhania) powder : ¼ teaspoon
  • Sugar : ¼ teaspoon(optional)
  • Salt to taste Oil for making thepla
  • Carom seeds (Ajwain) : ½ teaspoon
  • Ginger : 1 cm piece (fine chopped)
  • Fennel seeds (Saunf) : ½ teaspoon
  • Cumin (jeera) : ¼ teaspoon  
PREPARATION:  
  1. Clean the fenugreek leaves (methi). Wash them thoroughly in water.
  2. Finely chop the fenugreek leaves (methi), green chillies and garlic pods.
  3. Heat a little pan, add fennel seeds, cumin seeds and carom seeds. Roast till they start crackling. Remove from the heat and roughly crush the seeds.
  4. Take a bowl and mix the wheat flour, chickpeas flour (besan).
  5. Now add the spices powders, salt, roughly-chrushed seeds and the fine chopped fenugreek leaves (methi), green chillies. Mix it well.
  6. Also add a table spoon of oil and two big spoon of curd.
  7. Than add water slowly to knead to make a nice smooth dough. You may use around ½ cup of water. The dough shall be smooth and soft.
  8. Cover and leave the dough with a cloth and set aside for about 10-15 minutes (for better results 20-30 minutes) .
  9. To make Theplas/ flatbread, divide the dough into equal large lemon size balls.
  10. Take a dough ball, dust with flour and roll out to a flat thin disc. Heat a tava/pan (griddle).
  11. When well heated, place a thepla on the tava. Roast on medium flame both sides using the oil just like tortillas/ or any othe Indian Bread. Please refer to the link (Paratha-Indian Bread), to see the roasting steps.
  12. Serve hot. Enjoy with pickle, chundo or curd. 

NOTE : 
  • Chundo or Chunda is a sweet and spicy pickle made from shredded raw mangoes.
  • One of the major difference between the methi thepla and methi paratha, is that Methi Thepla is much thinner than paratha. But definitely its your choice how you wanna to have, thin or thick, you will enjoy it.
  • Ginger, carom seeds, fennel seeds, cumin seeds enhances the taste, however take them as optional.
  • I like the flavor of garlic, so I add it. You might leave it.
  • Theplas can be stored in the airtight container for at least 2-3 days.
  • Dry fenugreek leaves can also be used, but fresh gives richer flavor.
  • Active your senses and add the ingredients according to your flavor and avaibility. 
 Make sure you try your hand in making this today!
Read More »

01 June, 2009

me and my Hubby - Opposites Attract

...Opposites
attract because
they are not really
opposites
but Complementary..
Big thoughts struck me when I brush my teeth in the morning. And today one more thought struck me —I’m completely clueless with the toothpaste froth in my mouth – my Hubby and Me – are somehow total opposite.

And then a few more thoughtful lightening in mind and my past experiences provided some perfect examples to prove :


  • By Nature
I am a dreamer and a better word to use shall be a Planner by nature. I like to plan my day, each and every activity and try to execute the plan in the best practical way. For example: If, I am going to the market, I shall make sure to make a proper list of all the things to buy and also to manage to do the things that lies in between the way.

This habit of mine helps me to manage the activities in the most effective and efficient way. Hence, above all it helps me to avoid any sort of major crises.

But the drawback of being a hardcore planner is that, the decisions to make get a bit delayed. I tend to go into micro details, doing things step by step and achieving targets.

However, my Hubby likes to be Spontaneous. The good thing about being Spontaneous is that He takes the decisions quickly. It’s indeed a good thing that despite beings spontaneous he takes quick and right decisions.

Having said all that, I being a minute to minute planner and He being a Spontaneous choose the best possible way to tackle/manage the issues.
Opposits Attracts

  • Food Habits
He loves to eat food in “Thali” style. Thali means there is a huge dish in which the main course with many accompaniments is served. So one gets a chance to enjoy tasting many and different flavors in food.

But when it comes to me, I prefer eating one main course with the bread. The accompaniment with the main course does not tempt me. So in a way I am very specific about what I am eating.

Again, despite having different choices in food, we enjoy eating. Trying different cuisines and above all cooking for each other different dishes. Yes! You read right, He cooks for me, infact he is definitely a better cook than me.
  • Life-Style
I follow perfection. I keep my things, clothes etc in a very synchronize way.
But My hubby is a bit untidy. He keeps things wherever he gets space. Well then I know that almost all guys/bachelors have a natural-born tendency to be a bit untidy, hence I do sometimes ignore his habit. But then it doesn't mean his habit doesn't bug me and I'm sure I bug him well with my perfection too.

Right BalanceHappy Marriage is the Practical adjustments creating a healthy equilibrium between two people thought.
One has to understand that in today’s era a guy and the girl will have to help each other to carry the works efficiently. Gone are the days when the differentiation between the responsibilities of the man and woman were made.


I have never understood the concept of compromise. I have felt this strongly that Compromise means doing the thing with no personal interest and because one has left no choices. So, I find to compromise a very negative act to do. Therefore, I shall personally never follow or suggest anybody to Compromise in life, Marriage or any relationship. I believe in Accepting willinglyrather than to compromise. One must respect and willingly accept the choices their soul mate makes. Taking decisions or Accepting the one, the decisions must make a person Happy and Satisfied.
 

Adaptibility
The couple has to know the fact that marriage shall bring many changes to their simple living. They have to find a balance of their roles and responsibilities between economical, social and personal perspective.

For a girl, changes like moving to a new place, shall add new family members and new relatives are some of the prime changes to accept willingly. She will have to soon after the marriage, learn new steps and ways to carry on the things. So, here Adapting is the main key to all the puzzles. Adapting to new environment and people must be their priority after marriage.
They will have to catch the rhythm, follow each beat and match steps with each other and the family.

Listen
And when one shouts, other has to be silent and let the negative energy diffuses. Silence probably at that point means being Strong enough to handle the situation.
Relationship enriches when there is a time to Interact, Listenand Learn each other.
Indeed, some of the Greatest philosophies can be learnt but only if married. It is a through learning process. You learn from each other’s strengths. And hide the weakness of each other with your complementary strengths.

Just keep your honesty intact and you will find happiness. A great marriage is not when the 'perfect couple' come together. It is when an imperfect couple learns to enjoy their differences.

So the question arise again, Do opposites really attract? Well, I believed so. But at the end of the post I realized we are not as opposite as I thought we were. It’s interesting to explore that we having not much in common, found some common way to perform the best in us.
In science the Law of attraction works on the basis of Opposites Attracts.
Like a great Chinese symbol Yin-Yang. Like Yin-Yang, we have opposing qualities in phenomena. We transform each other. Also, like Yin Yang we create balance, a dynamic equilibrium. So until both energies do not vibrate in harmony with the other they will not be attracted to each other.

Indeed, the attraction lies in the opposing forces which are interconnected and interdependent in the natural world, giving rise to each other in turn.
 
Now, I have started trusting in being a bit spontaneous. .I don’t need a plan-sheet to have fun. Amazingly,my hubby have also understood, in leading a good life with a good life-style, so he takes care not to keep wet towel on bed. These are simple things, sometimes might sound silly or serious. It’s absolutely your choice how you wanna handle the big and little things in Life. Be open to your thoughts. Accept the ideas provided by your partner and find the mutual best steps to be taken.

Never forget to add a little humor, humanity and hope to your humming thoughts. Being opposite is fine because you fill up the each other’s blanks. As long as you can respect and pay interests to each other’s differences, it is a beautiful thing.
I’m glad that, I and my hubby are opposite and very much complementary to each other. We have more options and choices to make out of the issue. And hence well goes the saying that When a wife has a good husband it is easily seen in her face”.
Read More »