Showing posts with label Food. Show all posts

22 September, 2013

Lauki Ke Kofte - My style

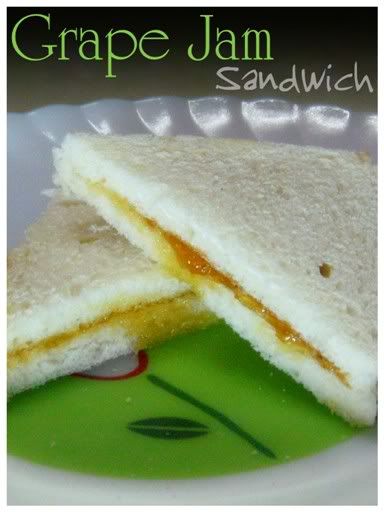
a complicated recipe made easy..

GGoing back into my childhood memories, I remember bottle gourd was grow into my garden. It was definitely a pleasure to see the vine growing longer and the little fruit bottle-gourd grow from a little finger size to a big hand size. But being a kid I used to dislike eating the bottle-gourd just like any other youngster would do. Though one of the most nutritious vegetable, it could never appeal me. However my mom had new tricks to make me eat it. She would prepare delicious bottle gourd kofta (recipe to be shared below) and lovely ghiya kheer. A recipe which not only me but my friends also used to also love it. Ghiya Kheer recipe can also be find out on this blog with this link : Ghiya Kheer.

Between bottle gourd have several different names all over India. Lauki, ghiya, dhoodhi, white gourd, bottle squash, calabash gourd etc. are some of the familiar names. It have a cooling effect, hence helps from heat stroke, its juice is often given to kids. For the people trying to lose weight, bottle gourd is one of the best option to eat, it is low in calories and fat and is on high in dietary fiber. Bottle gourd also have properties that would help in in improving the digestion.

It interesting to know, apart from eating and relishing recipes, bottle gourd in India is used to make the Indian musical instruments, such as the tanpura, sitar and rudra veena, which are constructed from dried calabash gourds imported from specific cultivators of Africa region.

So here sharing my favorite and mom's recipe in detail with pictures, which is absolutely loved by my friends and hubby too.

Serves: 4 to 6 pax easily.


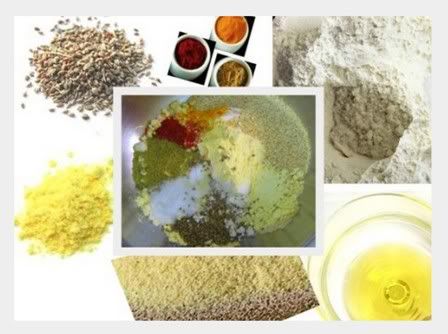
Ingredients for kofta:

  • a medium size bottle gourd : 1 nos.
  • small onion : 1 nos
  • garlic : 5-6 pods
  • ginger : 1 inch
  • green chilli : 1 nos.
  • coriander leaves : big bunch
  • coriander seeds : 2 tea spoon
  • cumin seeds : 1 tea spoon
  • black pepper : 4-5 nos
  • Salt : to taste
  • turmeric powder : 1/2 teaspoon
  • red chilli powder : 1/2 teaspoon
  • gram flour/ besan/ chana dal flour : 2 tablespoon
  • bread/ bread-crumb : 1 nos/ 1 tablespoon

Making of Kofta mix:

  1. Peel the gourd, discard the stem, grate the Bottle gourd/lauki/dhoodi atleast 2 cups.
  2. Fine chop the onion.
  3. Crush the garlic and ginger.
  4. Dry roast in the pan the cumin, coriander, black pepper seeds and crush them into the rough powder form.
  5. Mix the ingredients together with the gram flour and bread slice or bread crumb.


Making of the Kofta :

  1. Heat the oil in the deep pan for frying the balls/kofta.
  2. Mix all the ingredients and make small balls.
  3. The kofta balls should be smaller than the lemon size.
  4. Quickly add the tiny balls made up of the ingredients in the medium hot oil.
  5. Fry until golden brown and crisp from outside.
  6. Take them out on the tissue paper to extract all extra oil from the kofta.


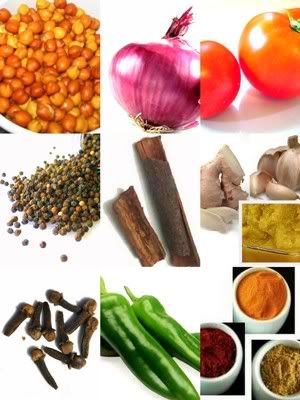
Ingredients for the Gravy :

  • Oil : 1 tablespoon
  • Tomatoes : 2nos
  • Onion small : 1 size
  • Garlic : 4-6 pods
  • Cumin seeds : 1/2 teaspoon
  • Coriander seed : 1 teaspoon
  • Cinnamon stick : smaller than 1/2 inch
  • Red chilli powder : 1/2 tea spoon
  • Salt : to taste

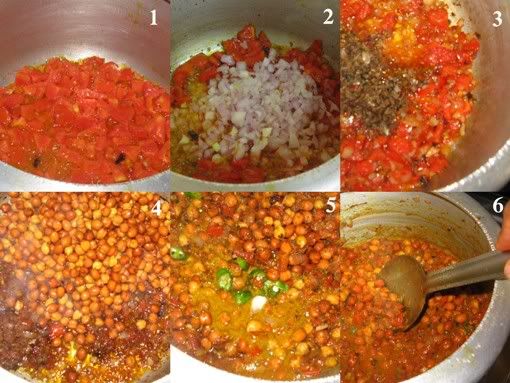
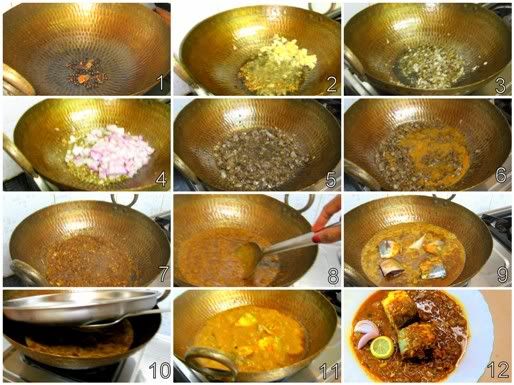
Making of the Gravy :

  1. Heat the oil in the pan.
  2. Add the fine chopped onion and fry until glossy.
  3. Crush the garlic and add into the dry powder in the spices, mix well.
  4. Add the tomatoes either fine chopped or paste.
  5. Cook well, until the spices leave the oil.
  6. Then add water and bring into the running consistency.
  7. Let the gravy boil for 2 to 5 minutes on medium heat and then leave them to the rest.
  8. Add the balls/kofta into the gravy ones its is all ready and leave them for the while before eating.
  9. Garnish with coriander leaves and serve hot with rice or chapati/roti.


Note :

  • Ensure that the bottle gourd has a smooth skin, is pale green in colour and free from any cuts, spots and blemishes. It should be firm to handle and the flesh should not feel soft when pressed. The smaller the size the less the seeds would be inside.
  • The quantity of the spices can to altered according to the taste.
  • If the bottle gourd/lauki/dhoodhi after being grated leaves water, then squeeze the grated bottle gourd with your palm and keep the water aside.
  • This bottle gourd water can be reused into the gravy to add more nutrition and flavour.
  • I personally love to add extra fresh green coriander leaves to the kofta to give more fragrance.
  • The dry masala/spices added into the kofta/balls is the same spice added into the gravy. So one can make it extra while dry-roasting it.
  • While you are mixing the ingredients for the kofta, heat the oil simultaneously. This will not only save the time but also prevent the kofta ingredients to leave the water again.
  • The kofta balls must be fried as quickly as possible after the ingredients are ready.
  • You can store the fried ingredients in the freeze in air tight container for two days.
  • When I was a kid, I used to love to eat the kofta soon after it was fried.
  • Kofta are one of the most nutritious piece of food, full of bottle gourd and gram flour.
  • Gram flour very healthy ingredient and is also a binding agent.
  • Bread-slice or bread crumb also help in binding but most of all it helps in giving the right texture since bottle gourd when being grated start leaving lots of moisture which makes it a bit difficult to make the kofta.

Hope you enjoyed! Try making at home for a better change from the routine food :)


Read More »

22 November, 2011

Quick Salad recipe – Thanksgiving Special

W Winters or summers, salads have no restriction to be cherished. I relish salad always since predominately I know they are healthiest form of eating vegetables and getting vitamins and minerals. But what fascinates me the most is it not just healthy, fresh and rejuvenating but it also can be in just few minutes. So quick to make and eat healthy.

Since, Thank-giving day is round the corner and a season of holidays, we need to spend more time with family and cook healthy for them. This is one recipe which can be transformed into so many variations creating new flavours to suit best to your taste buds, (written below in Notes*).


I’m here sharing a basic version rich in Vitamin C and nice sweet-sour crunchy flavours. This is a salad I often make and also make sure that I eat every alternate day.
Interesting part is we are adding garbanzo beans, the chickpeas and not the chicken ;)
So I’m sure all my dear veg-food lovers will love this easy recipe.

For two pax you will require...


INGREDIENTS:
  • Chickpeas/ garbanzo beans: 50 grams (Soaked overnight or for at least 6hrs latter boiled till soft.)
  • Black gram: 50 grams (Soaked overnight or for at least 6hrs latter boiled till soft.)
  • Cucumber: 1cup (peeled and diced into 1 inch cubes)
  • Onion: 1nos. (diced and washed in water)
  • Capsicum: ½ cup. (dry roast the capsicum)
  • Green chillies: 1nos (fine chopped, OPTIONAL)
  • Coriander/Cilantro leaves: 4-5 twigs (fine chopped)
  • Orange slice: 4-5 slices (peel, remove the seeds and cut them into small chunks)
  • Britannia NutriChoice Cream Cracker biscuits: 4-5nos (OPTIONAL)

SEASONING:
  • Salt : to taste
  • Sugar: ½ teaspoon
  • Lemon juice: 1 table spoon

PREPARATION:
  • Wash and soak chickpeas/ garbanzo beans overnight or for at least 6hrs in water.
  • Latter boil them or pressure cook them until soft in water with 2 teaspoon of salt. And keep it into the freeze to cool down.
  • Now peel the cucumber and dice it. Keep aside.
  • Same with onion cut them into dice shape and wash it in water so that the bitterness of onion gets less.
  • Take a capsicum/bell pepper, force a fork into it and directly roast on the heat. Keep turning it holding the fork. Roast until you find its skin bit of burning. Cool it down. Then scrap the burnt skin with same fork or knife. It is to give just a bit hint of roasting taste in the salad.
  • Chop fine the green chilli. You might like to deseed it to make the salad less hot.
  • Take few slices of oranges. Remove the skin, peel it, de-seed it and cut them roughly into small chunks.
  • Fine chop the coriander leaves.

METHOD:
  • Mix well all the ingredients in a medium bowl.
  • Squeeze the lemon.
  • Add the seasoning to taste.
  • Take the biscuits, lightly crush them and add them into the same mix of bowl. Mix all and Voila! Serve cold or room temperature.

NOTE:
  • You may use one ounce of Chickpeas/ garbanzo beans rinsed and drained from the can.
  • I have not used even a drop of oil and any kind of strong spices into it and that was the target to keep it simple, fresh and healthy
  • You may like to use carrots, boiled potato, few chopped mint leaves or few crushed pistachio nuts or walnuts.
  • You may take any and ‘n’ number of lentils, boiled or sprouted.
  • The same recipe with a tint of cream will give a rich flavour.
  • I sometimes like to add two spoon of curd.
  • You may like to add sweet tomato sauce if serving to kids.
  • Britannia NutriChoice Cream Cracker biscuits are amazing, adds crunch and texture to whole salad. It is with no added colors and flavorings for taste. It is this neutral taste that makes it an ideal choice to be consumed with hot beverages, dips, chutneys, and accompaniments. So keep creating new recipes.
Change the ingredients just a bit and you will find a total new dish with same fresh flavours and colors. Cooking is all about just cooking healthy. Innovation in cooking recipe comes naturally to suit best your taste buds.

I also take this opportunity to wish all my dear Blogger friends a Very happy Thanksgiving Day! You have always supported me and gracefully suggested me the best giving me a comfort and creativity simultaneously.

Thank you for being there for me!

I also take this opportunity to accept the beautiful  "the perfect poet award" for the poem "She's the Star". It was conducted by Thursday Poets Rally Week 56 (Nov 17-23, 2011). It's an infinite pleasure and honor to receive it! Heartily Happy and grateful. My Thanksgiving Week have already started with so much of surprises, hope and wish you all the same joy and grace!

Read More »

26 September, 2010

Easy quick Diet Pink-Sandwich

I’m simply a lover of sandwiches. 
For they are not only very quick to make, yet I do consider them one of the healthiest food one can enjoy at any time of the day. Beautiful amalgamation of colourful fresh vegetables with hints of spicy sauces and tints of sweet touch of honey makes it my favourite sandwich to enjoy at happy hours!

It’s, crunchy, sweet, spicy, juicy, healthy, fresh, bright in color...and just what not...titillating the taste buds!

Diet Pink sandwich
To view an enlarge picture Click Here

To view whole recipe Click the Link;
LINK:  Easy Quick Diet Pink Sandwich

Enjoy butterpunch at HappyHours!
Read More »

15 August, 2010

Quick Indian Snack - Samosa Recipe

One fine day one of my friend asked me, “How we-Indians got independence?”
I said we fought, struggled and latter got the freedom.

To this my friend said a story behind this fact that how we actually got the freedom from the Britishers. My friend said that one fine day the Britishers were invited by Gandhiji over a evening snack gathering. Those were served then with ‘Samosas’ with the tea. The Britishers got so amazed to see the Samosas. They wondered how come the potatoes went inside the samosas without a cut, slip or any opening. They were so surprised with the culinary skills of Indians and they gifted us by signing a treaty of freedom, the Independence. Perhaps, it’s the Samosas that we owe our freedom!

Well on the serious note, that’s all not true yet there have been so many stories attached the making of Samosas. For Samosas are truly delight tasty little savoury patties originated from India. In India, it is available every hook and corner of the street, quite cheap, easy to make and full of strong appetizing flavour.

Every person have their own signature way of making and adding the ingredient...yet I’m presenting the basic and the easiest way of making this snack that would be served at your tea-time or any time of the day when you like to munch a bit!
::The ingredients make around 15-20 samosas

Samosa
Samosa

For the quich easy delicious Recipe check the link below:
at ButterPunch Blog at happy hours :)
Read More »

02 June, 2010

Introducing debut - BUTTER PUNCH

Matar Masala Paneer


...inviting friends at the
Happy Hours!
with a ~BUTTER PUNCh..!
Introducing a brand new blog only for Recipes...cooking in wok..and inviting friends in the Happy Hours at Butter Punch.

~ This is one of the first recipes on this good-food blog. (TO Check the Recipe CLICK HERE).

Here, we shall prefer the recipes which are delicious and have minimum ingredients,a brand new blog only for Recipes cooking in wok and inviting friends perhaps which are easily available in the shops.

~ So all the good-food lover and passionate makers, roll on your sleeves, tie back your hair neatly, and move to kitchen for today to make, as here is the very quick, easy and healthy recipe for your desire of appetite.


To make it further better... we sure need your views, support and Recipes!
+ Kindly check the first recipe and Let us know You views!
+  Please do not forget to enroll and subscribe free for other updates :)
......Luv yeah all!


Read More »

21 May, 2010

Stuffed Masala Bhindi - Okra recipe

I'm back into my smoky kitchen with some spices and odd vegetables. Odd as I say because not many people like to eat okra. And no surprise; I’m among them.
Perhaps, when you think for the change from the routine food…odd vegetables turns up as magic in relishing the delightful tastes and aroma.
Though cooking bhindi bhaji is one of the quickest and easiest recipes, this Okra stuffed masala/spices is a bit complex recipe only for one who doesn’t like to stay longer in the kitchen. But sure ones energy spends in showing the skills, this recipe shall make you crave for more.


The stuffed masala/spices okra is quite crunchy, crisp, spicy and a tint of tangy in touch and tastes which definitely titles your tongue with quite a distinct earthy delicacy.
~ Okra - History Snippet:

So as always, before getting into the making of recipe, let’s start with few facts of the okra. This edible green fruit is also called okra, lady's fingers, or gumbo or bhindi (in India).

Okra have a very old history which probably originates somewhere around Ethiopia, and was cultivated by the ancient Egyptians by the 12th century B.C. Its cultivation spread throughout North Africa and the Middle East.
  • Interestingly, the seed pods were eaten cooked, and the seeds were toasted and ground, used as a coffee substitute (and still is).
  • In fact, at few places the leaves of okra plant are also eaten raw in salads.
Okra came to the Caribbean and the U.S. in the 1700s, which was probably brought by slaves from West Africa, and was introduced to Western Europe soon after. Today okra is popular in Africa, the Middle East, Greece, Turkey, India, the Caribbean, South America and the Southern U.S. It is not a very common vegetable in most European countries, except for Greece and parts of Turkey.

  • Okra forms part of several regional "signature" dishes.
Hence, these bright green, tender pods have gained a lot of respect as a vegetable almost all around the world. Moreover, okra is a good source of vitamin C and A, also B complex vitamins, iron and calcium. It is low in calories, a good source of dietary fiber, and is fat-free.
Okra bhaji is one of the common recipes that are prepared in India very frequently. Every state or family has its own way of cooking with particular ingredients. However, I prefer cooking with few ingredients yet have a rich taste. This recipe is one of them.

~ Ingredients for Stuffed Masala/spices Okra:
  • Okra/Bhindi/Lady-finger - ½ Kg or 20-25 Nos.
  • Onion – 1-2 (fine chopped)
  • Green Chilies – 2-3 (roughly chopped)
  • Turmeric Powder - 1 teaspoon
  • Red chilli powder – 1½ teaspoon
  • Coriander powder – 2 teaspoon
  • Salt - to taste (or 1 teaspoon)
  • Dry Mango powder – ½ teaspoon (optional)
  • Oil – 4-5 tsp.


~ *Mise en place:
  • Mix all the dry masala/spices with the water.
  • The spices mixed must look like a thick paste. Keep it aside.
  • Now wash properly the Okra in running water. Completely dry the okra/bhindi.
  • Trim the bottom and top.
  • Make a proper slit with the knife in the okra length wise.
  • Then stuff the masala in the slit of okra with the help of spoon.
  • Now fine chop the onion and green chilies.


~ Making of Stuffed Masala/spices Okra :

  • Heat the oil in a pan a big size skillet.
  • Now add chopped onion.
  • Let it turn golden brown and then add green chilies.
  • Stir in and soon add stuffed okra (bhindi/lady finger).
  • Add the left-over spices with half cup of water, so that the spice does not stick or burn to the bottom of the pan.
  • Cover and let it simmer on low-flame for next 15-20 minutes.
  • Stir in lightly in between occasionally.
  • Check if the okra has turned tender and golden brown.
  • Garnish with fresh green coriander leaves.
  • Serve hot with chapatti or paratha or any bread.

Note:
  • *Mise en place is very important in any easy or complex cooking.
  • Try buying the okra which is tender and small in size. If the okra is quite long, chop in half to make it around 2-3 inches in size.
  • Mixing the spices/masala in the water prior making the recipe helps in enriching the flavor. Mix some extra masala/spices so that it can be added from top while cooking.
  • I prefer the mustard oil; you can have any vegetable oil. However, mustard oil enhances the taste. Also if mustard oil is used, heat it till smoky hot or else it will have strange pungent smell.
  • While the okra is being cooked, do not stir it abruptly or else the okra might break in between and turn up very messy.
  • Dry Mango powder is optional to use, though few drops of lemon are alternative to it. A slight sour and tangy taste boosts the savor.
  • Also some like to add tomato, so if you add tomato add while onion turns golden brown. Nevertheless, I prefer just elementary okra and overpowering spices!
  • Some also prefer to add potatoes but it just up to you how you want to have it. Though, I prefer no potatoes in this particular recipe.
  • Let the recipe be spicy, tangy and crunchy!
  • *Mise en place: It is process defined in French phrase, "everything in place", as in set up. It is a step by step method of organizing and arranging the ingredients prior cooking. Where all the ingredients are kept ready to use to save time and avoid any last minute hurry or mistake made in cooking.
  • Follow mis-en-place religiously and see the difference!

 ~ Bon appetite!


Read More »

14 April, 2010

Soya/Dill weeds with Potatoes - Soya Bhaji

It been after a long, I have come up with the recipe, though this recipe will not take a long to cook.
~ This is definitely the one of the quickest, easiest, and delicious with few ingredients of recipe to fulfill your appetite and heart with its sweet aroma and flavor. It is Soya/dill weeds with potato or Soya Bhaji.
Perhaps, I don't mind to say this recipe also comes specially for my dear Lazy friends.

The soya/dill weed/leaves have slender stems, which are finely divided and have lovely green soft delicate leaves, slightly broader than the similar leaves of fennel leaves are just amazing. In fact, I don’t mind munching few tiny twigs just before cooking them.

~ Nutrition Value:
Above all the nutrition chart will indulge you to eat and relish it.
This popular herb contains no cholesterol; but is rich in anti-oxidants and dietary fibers which help to control blood cholesterol levels. It is also rich in many vital vitamins including folic acid, riboflavin, niacin, vitamin A, beta carotene, vitamin-C that are essential for optimum health. Dill weed is a good source of minerals like copper, potassium, calcium, manganese, iron, and magnesium.

In addition to it, 100 g of dill weed provides only 43 calories, but its phyto-nutrients profile is no less than any other high calorie food source; be it nuts, pulses, cereals or meat group.
So, let us scroll a bit of history of the Dill/Soya weeds before stepping up to the recipe.

Soya/Dill Weeds with potatoes
Soya/Dill Weeds with Potatoes
To Enlarge CLICK here

~ History:
Dill originated in Eastern Europe. Although several twigs of dill were found in the tomb of Amenhotep II (was the seventh Pharaoh of the 18th dynasty of Egypt. Amenhotep inherited a vast kingdom. His reign is usually dated from 1427 to 1400 BC.)
They report that the earliest archaeological evidence for its cultivation comes from late Neolithic lake shore settlements in Switzerland. Traces have been found in Roman ruins in Great Britain. [Ref. Wikipedia]

~ Name:
The name dill comes from Old English dile, thought to have originated from a Norse or Anglo-Saxon word dylle meaning to soothe or lul, the plant having the carminative (is an herb or preparation that either prevents formation of gas in the gastrointestinal tract) a property of relieving gas.

In Sanskrit, this herb is termed as Shatapushpa. The seeds of this herb is also termed as Shatakuppi sompa, Shatapushpi, Sabasige, Badda sompu, Sabasiga, Surva, Soyi, Sowa, Soya in Tamil, Hindi, Telugu, Kannanda, Gujarathi, Hindi, Punjabi etc.

Serves: 2 pax easily.
Ingredients:

Ingredients for Soya Bhaji

  • Fresh soya/dill weed - ½- 1 bunch or more (fine chopped)
  • Potatoes - 2-3 medium (quartered chopped)
  • Garlic pods - 3-5 (crushed and fine chopped)
  • Cumin seed - 1/2 tsp.
  • Red chilli powder – ½ teaspoon
  • Coriander powder – ½ teaspoon
  • Salt - to taste (or 1 teaspoon)
  • Oil - 1 tsp.


Method of Making of Soya/Dill Weeds Bhaji with potatoes:

Making of Soya Bhaji

  • Heat the oil in a pan.
  • Now add and toast the cumin seeds.
  • Then add the crushed and finely chopped garlic pods until they turn slight golden brown.
  • Stir in and soon add quartered chopped potatoes.
  • Cook for 2 minutes. Stir in and then add all the dry spices like red chilli, coriander and salt.
  • Add soya/dill weed and mix it well.
  • Cover and cook on medium-low for about 10-12 minutes or until the potatoes are tender.
  • Serve hot with rice or with chapatti or paratha or any bread.

Note:
  • Potatoes are optional yet they are delicious and multiply the quantity.
  • Fine chop or rough chop for the soya/dill weeds will do.
  • Do not over cook, or eles the soya/dill leaves loses its green color.
  • Just a quick toss concept has to be considered while cooking this dish.
  • Some people like to add ginger, garam masala, aamchoor(Dry Mango powder) to it…but I prefer the absolute sweet strong fragrance of soya/dill weeds.
  • You may also add the Saunf/Fennel leaves with the soya/dill weed leaves to enhance the taste/flavor .

~ O dear sometimes yet sometimes even the weed (dill/soya weeds) can be so delicious, and quickest to cook, aren’t they!
~ Hope you enjoyed! Try making at home for a better change from the routine food :)
Read More »

11 December, 2009

My style - Fried Rice

Winter waves have already begun in all parts of the country.
Eat hot spicy food to overcome the winter blues. And I’m right here with my own way using the left over rice.

Rice mixed with numerous colorful vegetables and flavored with the spices, is a great amalgamation to enrich the multiple flavors and is an energy booster. Adding lots of vegetables to add fibre and to stay satisfied with healthier food.

You might just like to add the butter over the hot rice oozing out making it even yummier!
It's indeed a perfect in winter’s recipe!

So don’t be bored or suffer from the grey clouds or the lack of light in this winter, pick your own basket of favorite flavors of the vegetables, give a burst of energy and zing on your own to cook this very easy recipe.

Enjoy! This fried rice is delightfully delicious, will warm you up in winters.


Fried Rice my Style


Ingredients for making fried Rice:

ingredients for fried rice
  • Rice (cooked) - 2 cups
  • Oil - 3 tbsp
  • Capsicum Finely Chopped - 50gms
  • Carrot Finely Chopped - 2 Nos
  • Peas – 50gms (1/2 cup)
  • Onion Sliced - 1No.
  • Cabbage Finely Chopped - 100 gms
  • Spring Onions Finely Chopped - 2
  • Green Chilies fine chopped - 2-3 Nos.
  • Ginger Chopped Finely - 1 tsp
  • Garlic Finely Chopped – 5-6 flakes
ingredients for fried rice
  • Red chilli powder- 1 teaspoon
  • Turmeric powder-1/2 teaspoon
  • Coriander powder -1tsp
  • Black pepper- 8-10
  • Cumin seeds- ½ tea spoon
  • Cinnamon – ½ inch
  • Sugar- ½ teaspoon
  • Salt to taste
  • Worchester sauce – 1 tsp.
  • Oyster sauce – 1 tsp.


Method of making fried Rice:

making of fried rice

  • Heat the pan, add the cumin seeds, cinnamon stick and black pepper. Roast them for a minute and then crush them into powder and keep aside.
  • Now heat oil in a pan. Fry carrots and capsicum.
  • Add peas and stir well. Keep the high flame.
  • Now add onion, ginger, garlic and green chilies, stir well.
  • Keep stirring and now add the spring onion, on medium heat.
  • Add the sugar and salt simmer for a minute.
making of fried rice
  • Add the crushed powder and stir well the vegetables.
  • Add turmeric powder, red chilli powder and coriander powder, simmer for 2 minute.
  • Mix in the sauces in to the vegetables.
  • Add the boiled rice into the mix of the vegetables and stir continuously till well set.
  • On the slow heat cover the pan let it set (for about 2 min).
  • Delicious spicy fried smoky rice is read. Serve hot.

Note:

My style fried rice

  • The soya sauce is alternative for Worchester and oyster sauce. However, its really fun to have different sauces at home to add and create a change in flavors. Trust me oyster sauce is fabulous!
  • You can add shredded cabbage also, simply any vegetable, even paneer chunks or omelet pieces. Enrich your dish with more nutritious.
  • Cooked rice could be your let-over rice…So what are you waiting for, make the best use of them to relish your tastes.
  • Add the ajinomoto salt to enhance the flavors.
  • Deseed the green chilles, to avoid the sting hot flavor.
  • Keeping the half cooked vegetables only enrich the nutrient of the food.

~ Hope you liked the recipe, so do try at home and let me know how was your recipe!!
~ Enjoy your Winters:)
Read More »

12 November, 2009

Sweet Simple Signature sandwich

Grapes turn sour! Nope I’m not saying any sour grape proverb. Few days back I bought some grapes and they were too sour to eat :(

Being cozy on the couch, up my heals, holding higher up the bunch of sweet and luscious grapes and eating each one at a time, is what I love the most.

Yeah! Even I’m lazy and I love it.

A lazy day and me a lazy one, takes two slice of bread and heap of sugary sweet jam over it and in my mouth goes a full of life bite, bouncing me back so lively.

However, when the grapes turn sour, I prepare sweet jam, simple! The recipe of the grape Jam is very easy and hardly takes time to prepare.

This recipe is for all who are happy to revisit and will revisit the happy childhood days. Enjoy this delicious comfort food.
So let’s hop a bit into some history, facts and origin of the grapes and jam sandwich followed by the Grape Jam recipe.

Grape Jam Sandwich

  • Grape fruit:
A grape is the non-climacteric fruit, botanically a true berry which grows on the deciduous woody vines. Bunch of tiny fruits, grapes are eaten raw and are used to make jam, jelly, vinegar, wine, grape sees extracts, raisins and grape seed oil. Grapes are also used in some kinds of confectionery. It is grown in clusters of 6 to 300, and can be crimson, black, dark blue, yellow, green and pink.

  • Nutrition Value of Grapes:
The rich nutrition and anti-oxidants in grapes make this fruit wonderfully healing and is a miracle help for many ailments. Tiny grape has high content of vitamins A, B1, B2, B6, C and abundance of minerals which includes calcium, chlorine, copper, fluorine, iron, magnesium, manganese, phosphorus, potassium, silicon and sulphur. Grape seeds have highly protective flavonol anti-oxidants that scavenge free radicals and promote the growth and repair of tissues.

  • Origin Fact about Grapes:
The appearance of Common Grape Vine (Vitis vinifera) is a species of Vitis on earth has been dated to between 130 to 200 million years ago. Mankind’s relationship to this plant dates to the Neolithic period.

Amazingly, the ancient Egyptian ‘Hieroglyphicsalso shows the cultivation of grapes for both eating and wine production. "Hieroglyphs" refer to the characters made by graphical figures, be it animals or objects. The features that are visually well arranged about heavenly bodies, natural phenomena, animals and plants, God, humans, residences and households were used for 3000 years for recording Egyptian.

Ancient Greeks called this system Hieroglyphs, literally "sacred writings", because it was mainly used by government officials for God.

Wild grapes were harvested by foragers and early farmers. For thousands of years, the fruit has been harvested for both medicinal and nutritional value; its history is intimately entwined with the history of wine.

  • Origin of Jam Sandwich:
Jam Sandwiches are a type of cuisine which are composed normally of two slices of bread, butter or margarine, and jam (traditionally strawberry) which is normally consumed at lunchtime or as a quick "snack." Ref.wikipedia

Jam Sandwiches are thought to originate at around the 19th Century, in the United Kingdom as an affordable food which was mainly consumed by the lower/working class people of cities such as London. The plausible reason that most lower/working class people consumed this as a major part of their diets is that it was the ingredients that it is made from cost little to manufacture and due to taxes being lifted on sugar in 1880, became widely available as a cheap foodstuff.

So here is the recipe of Grape Jam.

Ingredients for grape Jam


Ingredients for the Grape Jam:

  • Grapes fruit- 250 grams
  • Sugar – ½ cup
  • Lemon juice – 2 tbsp

For your convenience TWO different ways are mentioned to make this jam. One method is making the Jam in the Microwave Oven and other making the jam on the popular common Stove. Choose the method that you feel comfortable in. Follow the steps accordingly.
 Making of Grape Jam


Making of the Grape Jam in Microwave Oven:

  • Wash the grapes enough to remove the dirt. Slip skins from grapes. Remove seeds from the grapes if any and cut into half.
  • Mix the sugar and grapes in the microwave safe bowl. Microwave at 100% power for 3-4mins, or till the grapes are softened.
  • Microwave (covered) the mixture at 60% power for 7-8mins, or till its slightly thickened and translucent. Stir in between to prevent scorching.
  • Stir in the lemon juice, pour in sterilized jar and refrigerate.

Making of Grape jam on Stove:

  • Wash the grapes enough to remove the dirt. Slip skins from grapes. Remove seeds from the grapes if any and puree it in the mixer grinder.
  • Transfer the puree of grapes on a heavy bottomed pan.
  • Add sugar and cook over low heat, stirring constantly, until sugar is completely dissolved. (Do not allow mixture to boil until sugar is dissolved)
  • Bring jam to a boil and boil rapidly without stirring until the jam has reached the setting point. (This can take from 5 to 20 minutes)
  • Keep stirring frequently until the pulp is broken down into a thick mixture. This will take about 20-30minutes.
  • To test the jam, remove it from heat, then drop a teaspoonful on a chilled plate and chill it for 1 minute. Tilt the plate: Jam should remain in a mound and not run. If jam runs, continue cooking at a slow flame and let it boil for sometime.
  • When it is really add the lemon juice and mix it well.
  • Seal and store in sterilize jars and refrigerate.Jam is ready. Relish it!!

This Grape Jam sandwich of for all those who haven't eaten one for years. It's just one humble bite that takes you straight back to your childhood. Enjoy this sweet simple signature sandwich, Happy Children’s day :)

  • My Blog post selectedThe post "Sweet Simple Signature" Sandwich has been selected by Blogadda as one of the Spicy Saturday pick.
Read More »

10 October, 2009

recipe for lazy man - Ajwain Paratha

I'm back with a crunchy, tasty and healthy recipe for my dear Lazy friends! This shall be proved to you in the next few lines...

Ajwain Paratha

It is the Ajwain Paratha in the Smoky Kitchen today. What! I love the most about this particular Azwain Paratha recipe, is the combination of the sunrise golden color crispiness of the paratha/bread and a strange an amalgamation in crunchy grainy texture due to semolina added. A strong aroma of the raw Ajwain Seed (carom seeds) is simply matchless to any spice found in the kitchen. Amazingly, a little amount of Ajwain Seeds actually dominates the flavor of the dish.

Whenever I make this paratha with all the quick skills…I instantly breathe life!  SO let's proceed our experience with some detail on Ajwain Seeds and then followed by the ingredients with the making of the recipe.

Ajwain also known as (Ajowan caraway, carom seeds or mistakenly as bishop's weed), is an uncommon spice except in certain areas of Asia. Ajwain smells almost exactly like herb thyme. Ajwain is originated in the Middle East, possibly in Egypt. In India, the major Ajwain producing states are Rajasthan and Gujarat, where Rajasthan produces about 90% of India's total production. Interestingly, it is believed as aids in digestion. (ref. wikipedia)

Ingredients for Azwain Paratha


~ Easily Serve: 2-3 pax.
Ingredientsfor Making Ajwain Paratha:

  • Whole wheat flour: 1½ cup (Shall make 6-8 paratha)
  • Semolina (Sugee): ½ cup,
  • Gram flour (Besan): 1 tablespoon,
  • Turmeric powder: ¼ teaspoon,
  • Red chilly powder: ¼ teaspoon
  • Coriander (dhania) powder: ¼ teaspoon
  • Carom (Ajwain) seeds: 1 teaspoon
  • Salt to taste.
  • Oil for making parathas
  • Water to knead the dough

Method of Making Ajwain Paratha:
  • Take the semolina (sugee) on to the pan on low flame and slowly roast them dry until it turns golden brown.
  • Now add all the ingredients with the semolina in the Bowl. Mix it well.
  • Than take sufficient water and add into the mixture slowly little by little to make dough and strongly knead into nice smooth dough. You may use around ½ cup of water.
  • The dough shall be smooth and soft. Cover and leave the dough with a tissue/cloth and set aside for about 5-10 minutes (if in hurry, than no need to set aside).
  • To make paratha/flatbread, divide the dough into balls. Take the size large as of a large lemon. Take a ball, dust with flour and roll out to a flat thin disc.
  • Heat a tava/pan (griddle). When well heated, place a paratha on the tava. Roast on medium flame both sides using the oil.
  • Please refer to the link (cooking Parathaa on Tawa).
  • Serve hot with any sabzi or curry along with curd/raita.

NOTE:
  • If you are in sheer hurry, skip roasting the Semolina (sugee), add it directly to the mixture to make dough.
  • To make the ajwain(Carom seeds)- paratha, soft, add two tablespoon of curd while making dough. To keep the parathas crisp, skip the curd.
  • You might also like to add the (chickpeas flour) gram flour 1tablespoon with the flour while kneading to add earthy flavor. Perhaps it’s optional! However I like to add it :)
  • Play with different aromatic spices. After all it's Indian Kitchen.
  • Active your senses and add the ingredients according to your flavor.

And as I have always believed in the perfect quote,
Never leave Hope in dismay, until dismay leaves you.
...So, never leave the Hope in cooking even if your kitchen turns into smoke and mess. Believe me, the moment it’s a mess, you will learn from the mistake and next time, the best you will perform ever since then...Wish you all the best in the kitchen and hope you enjoy making and relishing the Paratha!
Read More »

30 September, 2009

Indian Broad Beans with Baby potato Curry

Gorgeous green in color and distinctive flavour of broad beans/ sem ki phalli have a long tradition of cultivation, is among the most ancient plants in cultivation and also among the easiest to grow. So as the history goes, this broad bean with baby potatoes stir fry recipe is quick, simple, easy and very satisfying to make. Indeed, lazy-man can try their hand!

I like it hot and spicy with chapatti. And yes! The next day I don’t mind eating the left-over of stir fry broad beans curry as the stuffing in the sandwich.

Broad Beans with Baby Potato

This neglected legume, being a bean offers a robust flavour and high nutritious; like phosphorous,thiamine, riboflavin, vitamin A and C and is notably rich in protein too.
 Serves: 2 pax easily.
 Ingredients:

Ingredients for Broad beans stir fry recipe
  • Indian Broad beans/Sem Ki Phalli -15 to 20Nos.
  • Baby Potato - 7to9 Nos. (Cut into half)
  • Tomato -1 medium size
  • Garlic pods – 6-7 (crushed and fine chopped)
  • Cumin seed – ¼ teaspoon
  • Turmeric Powder- ¼ teaspoon
  • Red chilli powder – ½ teaspoon
  • Coriander powder – ½ teaspoon
  • Salt - to taste (or 1 teaspoon)


Method of making Broad beans with Baby potaoes Stir fry Curry:

Manking of Broad beans with Baby potatos


  • Wash,destring,trimmed ends and cut into 1 inch pieces of the broad beans/sem ki phalli and also cut the potatoes keep aside.
  • Heat the oil in a pan. Now add and toast the cumin seeds.
  • Then add the crushed and finely chopped garlic pods until they turn golden brown.
  • Than add chopped tomato and fry untill cooked. 
  • Stir in and soon add baby potatoes. Cook for 2 minutes on high flame.
  • Then add the broad beans pieces and mix it well. Cook for another 2 minutes.
  • Stir in and then add all the dry spices like red chilli, coriander, turmeric powder and salt.
  • Cover and cook on medium-low for about 10-12 minutes or until the beans pieces and potatoes are tender. Serve hot with rice or with chapatti.
Note:
  • MLLA15Logo375Just in case if the broad beans are hard, and then add boil water to half filled pot for two minutes. Don’t overcook and drain them into a colander. Latter trim ends and cut into 1 inch pieces.
  • If the broad beans are very tender, then you can skip this step and proceed.
  • When covered and cooked, keep check that the spices do not get stick the bottom of the pan, sprinkle some water to avoid sticking the bottom.
  • After they are cooked, sprinkle ½ teaspoon of Aamchur (Dry Mango powder) or squeeze ½ a lime juice, this will enhance the beans flavor.
  • This post is also dedicated to wonderful competition "My Legume Affair 15",  hosted by Susan.
Hope you enjoyed! Try making at home for a better change from the routine food :)


Read More »

03 September, 2009

Rajasthani Gatte ki sabzi Recipe - Closet Cooking with mummy

Rajasthan is one of the most popular travel destinations in India. It is believed that every third foreign tourist visiting India makes sure to travel Rajasthan.

Historical Monuments, Palaces, Lakes, Forts, sun, sand, colorful Turbans of man, long colorful Skirts of woman, arts and crafts, Camels, elephants, monkey, tiger, warm hospitality are the bench mark in the  Indian Tourism and is famous world-wide. Rajasthan retains it's glory and richness of marvelous history, colourful traditions and its very own spicy delicacies of varied cuisine. Rajasthani meal served with dollops of love and ghee(clarified butter), makes a success story everywhere.

It is the; Royal Rajasthani Cuisine which has still maintained its own beauty and authenticity of the recipes over the generations. Gram flour (besan/chickpeas flour) is one of the major ingredients and is used to make many of the delicacies.
Over centuries to titillate the palate with Rajasthan's exotic styles of cooking recipes and dishes, there is one nourishing Besan ke gatte dish which has retained it's own unique culinary art and classic flavour.
Rajasthani Besan ke Gatte

I’m glad that this recipe comes directly from My mother and infact it is she who is making the dish. As she was making the dish following a certain way, I observed and realized that the recipe is very easy and above all only basic species which one can always find in an Indian Kitchen. So heres from mom, a mouth-watering, closet cooking of the authentic Royal Rajasthani Besan ke Gatte recipe.
  • Serves 4-5 pax easily:
IngredientsIngredients for Gatta :
  • Besan (bengal gram flour) – 200 Grms/2cups
  • Red chilli powder – 1teaspoon
  • Turmeric Powder – ½ teaspoon
  • Hing Powder(asafoetida) – one pinch
  • Wheat flour – For Dusting
  • Salt to taste
  • You will also need one chop-stick.
  •  Oil for frying gattes.
Ingredients for Gravy :
  • Ghee/oil - 2 tablespoon
  • Red Chilli Powder- 1teaspoon
  • Dry Coriander powder- 1 teaspoon
  • Cumin Seed powder – ½ teaspoon (optional)
  • Hing Powder (asafoetida) - 1Pinch
  • Salt to Taste
  • Coriander leaves – to garnish

Method to make Gatte :

Making Besan ke Gatte 1
  • In the bowl take besan(chickpeas flour), red chilli powder, turmeric powder, hing and salt.
  • Mix it well and now add water in the mixture to make smooth-stiff dough. Add water slowly.
  • Take whole dough and divide into small equal portions to make round balls.
  • Now dust a bit of wheat flour and roll the dough with the rolling pin.
  • Let the dough ball turns flat like any other roti/chapatti or Indian bread.
  • Now again dust a bit of wheat flour and keep the chop-stick at the corner of the flat dough rolls about 5-6 inches long.
  • Now start rolling around the dough and let the chopstick be in the middle.
  • Slowly pull the chop-stick out of the rolled dough.
  • Do the same process with all other dough balls.

Making Besan ke Gatte 2

  • Now boil the water in the deep pan.
  • When the water starts boiling add all the rolled dough sticks/rolls with the hole in between.
  • Boil them for about 6-7 minutes.
  • Check one by pressing in between the fingers.
  • When they are perfectly done they will turn tight and quite solid/stiff/hard in texture.
  • After they are done, strain the gattes and keep aside to cool.
  • Also store the boiled water used, for latter adding in the gravy.
  • Then take the strained gatte sticks/rolls and cut into small pieces around 1inch in thickness using knife.
Method of making Gravy for Gatte :

Making Besan ke Gatte 3
  • Take a small bowl and mix to make a smooth paste with water and the dry powdered spices like coriander powder, red chilli powder, salt and turmeric.
  • Now add ghee/oil in the pan and heat it.
  • Now take those small pieces of the roll of the gates and fry them until they turn a bit reddish-brown in color. Take them out on the oil soaking towel.
  • Now take the same pan and remove any extra oil is there.
  • Then add cumin seeds (jeera) in the heated oil. Also add a pinch of hing into it. ]
  • After few seconds add back the reddish-brown fried gates and followed by the paste of species made with water and kept aside. Keep stirring it on high flame for couple of minutes.
  • Now add sufficient water to the pan. Let the gattes get soaked inside the pan.
  • Simmer the flame and let it cook in their own juices, around 12-15 minutes. Do not stir hard now, as the gattes might break. Be gentle and stir only ones.
  • Later the gravy shall turn thick. Royal Besan ke Gatte ki sabji is ready.
  • To garnish sprinkle some fine chopped green coriander leaves before serving with bread/chapatti/paratha/puri/rice.
Note:
  • When (in making dough and gravy) add water, very slowly and carefully.
  • Some people also like adding curd to the gravy but I like it simply.
  • Hing powder (asafoetida), helps to enhance the flavour of the dish.
  • No ginger, garlic or onion is used in this recipe.
  • Using the chop-stick is optional to make hole in the middle of the gates. One can directly and softly roll it and then cut into small pieces. But I like the other way round as this allow the gattes absorb gravy verywell, making it tastes better and juicy. You will surely find a difference!
  • The Picture below capturing the Rajasthan Touch is taken by Amit Semwal, who always incredibely captures the soul of the people with it's own very unique way to uplift the aura. Thanks! Buddy for the Picture.
Rajasthan Touch @ AmitSemwal
Read More »

11 August, 2009

Legume Love Affair - black chickpeas curry

The Chickpea belongs to legume family. Legume refers to the seeds of certain plants, a simple dry fruit which are low-fat, low-cholesterol substitute for meat. Chickpeas are high in protein and are one of the earliest cultivated vegetables. 7,500-year-old remains have been found in the Middle East.

Believe it or not but in 1793 ground roast chickpeas were noted by a German writer as a coffee substitute in Europe and in the First World War they were grown for this in some areas of Germany. Chickpeas are still sometimes brewed instead of coffee. [wikipedia]

For me chickpeas reminds me of my school days when in third standard, my science teacher told us to grow a plant in the small pot as an assignment for learning the growth and parts of the plant. I used to take a small ice-cream plastic bowl to plant chickpeas seeds in it. India is the world leader in chickpea (bengal gram) production.

Black Chickpeas Curry


There are two main kinds of chickpea:
  • Black Chickpeas (Desi / Kala Chana), which has small, darker seeds and a rough coat, cultivated mostly in the Indian subcontinent, Ethiopia, Mexico, and Iran.
  • Kabuli Chana(Chole/garbanzo beans), which has lighter colored, larger seeds and a smoother coat, mainly grown in Southern Europe, Northern Africa, Afghanistan, and Chile, also introduced during the 18th century to the Indian subcontinent
Usually, people like eating the Black chickpeas (desi/kale chane) in breakfast or as some evening snack cooked which have a very basic recipe that is boiling them till soft and then in very little oil slightly sautéing those with fine chopped onion, some seasonings and mixed with a tint of lemon juice.

I prefer a step further, cooking black chickpeas (desi/kale chane) as in a Curry. When one does not have any green vegetables in stock, these legumes are the best and easiest options to cook in the earthy delicacy.


Ingredients of Black-Chickpeas Curry:

  • Kala Chana CurryOnion-1 (chopped medium size)
  • Tomatos-2 (large size)
  • Green chillies-2-3Nos (optional)
  • Coriander Powder-1 tablespoon
  • Red Chilies Powder-1 teaspoon
  • Turmeric Powder- ½ teaspoon
  • Cinnamon Stick-1/4 inch
  • Black pepper-6-7Nos
  • Cloves- 2-3 Nos.
  • Salt- According to taste
  • Ginger-1inch
  • Garlic pods-6-8 Nos.
  • Oil- 3tablespoon.

Making of  Black Chickpeas Curry:

Making of Black Chickpeas Curry

  • Wash and soak the black chickpeas (kale chane) in water for at least 6-10hours or overnight. Rinse the chickpeas and keep side.
  • Dry roast the cinnamon stick and black pepper on the hot pan. Cool it and then crush to make them powder.
  • Either take ginger-garlic paste directly or make one by crushing them together to form paste and mix the dry roasted cinnamon stick and black pepper powder.
  • Fine chop the Onion and tomatoes.
  • Take other dry spices like turmeric, salt, red chilies and coriander powder in the bowl and mix to make paste texture with water.
  • Now, take a Pressure Cooker and heat oil in it.
  • Then add the cloves and following it add tomatoes.
  • Cook the tomatoes till glossy.
  • Now add fine chopped onion and cook till the onion turns golden brown.
  • Now add the ginger-garlic paste mixed with roasted cinnamon stick and black pepper powder.
  • Cook for next 2 minutes. Then add the spices (coriander, chili, turmeric powder and salt) paste made.
  • Mix all together well and cook until it turns golden color and leaves oil from the mixture.
  • To avoid the spices sticking at the bottom add ½ cup of water.
  • Now add the over-night soaked black-chickpeas into the vessel and mix it well with the spices.
  • Keep the high flames keeping stirring and roasting the black-chickpeas with the spices for next 5-10 minutes.
  • Now add chopped green chilies and 4-5 cups of water.
  • Close the pressure cooker with the lid and cooking until 8-10 whistles.
  • After all whistles done cover the vessel/cooker and let the smoke mixes well.
  • Check the consistency, simmer till required consistency. Also check pressing one of the chickpeas have turned soft. Add more water if required and boil.
  • Keep on rest for couple of minutes. Garnish with coriander leaves or fine shred of ginger.
  • Serve hot. Enjoy with warm rice or chapatti/bread.
Note:
  • Black Chickpeas LegumeYou can boil the black-chickpeas separately until soft and also one can use the same water in which chickpeas boiled to make curry.
  • One can also use ginger garlic paste.
  • Paste of onion and tomato can be used.
  • To enhance taste on can add the lemon-juice at the end before serving.
  • Better to use the pressure cooker than a normal pan, as it saves time and fuel.
  • The number of whistles in pressure cooker might differ. So if you are not sure then, after every 3-4 whistles open the pressure cooker and do check the chickpea have turned soft.To check, take one chickpea and press in between with fingers.
  • This recipe is also dedicated to the wonderful competition "My Legume Love Affair14" hosted by Susan,"The Well-Seasoned Cook" Blog.
Read More »

12 July, 2009

Healthy Food - Mix of Lentils

Dal or lentils is the staple food in every Indian home. Lentils, you'll find in almost every Indian kitchen. For the vegetarian, lentils are the complete delight diet as a common source of high protein. Lentils are boiled to a stew-like consistency seasoned with a mixture of spices. In some recipes, the lentils are boiled with vegetables and know as rasam and sambhar.

South India has recipes of rasam and sambhar where the lentils are boiled with vegetables. In India, each region has its own favorites and cooking methods of lentils. I’m here sharing my home recipe for the “Mix of lentils”. The Split Black lentils (Urad dal) is the main lentil mixed with the other lentils like toor/arhar dal (yellow lentils/pigeon pea) and chana dal (Split Chickpeas), tempering with garlic. The best combination for a healthy diet this recipe has, that it has low fat and high protein.


This recipe is quick to make and being high in protein, simply very deliciously healthy to relish. Also adding this recipe today, have a genuine reason as this is my Paa’s favorite dish and today is his Birthday too. So here's wishing Happy Birthday Paa! Enjoy!!

Serves easily 2 Pax:
Ingredients for Recipe:
Ingredients

  • Split Black Lentils(Kali dal with cover) - ½ cup
  • Split Chickpeas(Gram/Chana dal) lentils – ¼ cup
  • Yellow(Arhar/Toor dal)Lentils – ¼ cup
  • Garlc Flakes – 4-5Nos.
  • Green Chilli- 1 Nos.
  • Salt - 1 teaspoon (according to taste)
  • Turmeric - 1/4 teaspoon
  • Red chilli Powder- ½ teaspoon
  • Coriander Power- ½ teaspoon
  • Ghee (clarified butter) - 2 teaspoons
  • Water- to pressure cook/boil.


Making of the recipe:
  • Measure the lentils in the cup and wash in water for a couple of times. And keep aside rinsing it.
  • Chop the green chili roughly.
  • Now take water (around 2-3 cups) in the pressure cooker and add the lentils.
  • Also add the chopped green chili and other all dry spices with salt into it. Mix it well.
  • Now cover the pressure cooker, and cook for 2-3 whistle.
  • When the whistles are done, open the cooker and check the lentils are cooked. The lentils must look cooked and soft. To check take a gram lentil in hand and press to find it soft in texture. If not done, cover it and let one more whistle.
  • In the mean time, cut finely the garlic flakes for tempering.
  • Take a ladle or pan for tempering. Heat it; add ghee and then the fine chopped garlic flakes.
  • Let the garlic turn golden brown. Quickly add this golden brown garlic into the dal (lentils) prepared. Cover with the lid, the vessel/cooker and let the smoke mixes well with the lentils. Keep on rest for couple of minutes.
  • Serve hot. Enjoy with warm rice or chapati and pickle as side dish. 

NOTE:
  • You can soak the lentils in the water for 10-15 minutes prior cooking.
  • Ghee must be used. Substitute is Butter.
  • I have also added just ¼ cup of Urad dal gives smoothness to the Dal. Of coarse it is optional.
  • Also I love the Toor/Arhar Dal so I have added it you might skip it. But adding it will only add on the protein so no worries :)
  • After the dal/lentils are cooked and before tempering, you may also just a bit mash the dal/lentils with the laddle so that the juices of different dals/lentils mix up well.
  • But definitely in this particular recipe of Black Dal, the tempering must be done of the garlic.
  • If you don’t have a pressure cooker, then a small vessel can be used to cook.
  • Keeping this recipe in the thick texture add more flavor. So use the water accordingly.
Read More »

07 July, 2009

Fish Curry - Cook Like Grandmother


Everything you need to turn your kitchen into a paradise lies in from ingredients, to spices, to gadgets, to utensils. Yes! Right kind of the utensils and vessels plays a vital role in the comfortable cooking of any cuisines. Cooking Indian cuisines, the best works is the Indian Wok. Somehow, the design and shape of the Indian Wok have not changed over centuries.
My mom liked to cook her food in the wok made of real Iron Metal which looks dark and strong and often changes the color of the food cooked in.

Cook like Grandma, the Fish Curry

I also have my non-stick woks to stainless-steel woks but I believe that my very own traditional Indian Wok (Kadhai) made from brass metal is the best. This was gifted by my mother-in-law, who always prefers to make food in the brass wok. This wok has hemispherical in shape with no flat spot on the bottom. Their handles are two large round rings that stick almost straight up. It’s bottom which makes for quicker and more even distribution of heat. The design makes them ideal for cooking over a fire. A bright golden wok with tints of traditional circular design makes it look so special and graceful.

My Golden Wok

I made my very traditional Indian fish curry in this brass wok which tasted so wonderful. Cooking fish hardly takes 10-15minute, making it the simplest dish. I like making fish curry in the Bengali style with panch-phoran species or like Patrani-Machi from Gujarat which is cooked with steam, but the most I love is the one which have the recipe directly from my Grandmother. This fish curry is made the same way as my grandmother cooked. It is easy, spicy, and extremely delicious with ethnic rough gravy makes it taste like a complete divine recipe. Very few but specific species cooked in the Indian traditional wok makes this recipe a sure delight to relish eating.

Recipe for 2 pax:
Ingredients for Fish Curry
    Ingredients
  • Fresh Fish (Indian Mackerel)
  • Onion - one (medium size)
  • Garlic – 2 full pods(around half cup)
  • Black Pepper – 1 tsp(around 10-15)
  • Cinnamon Stick – 1inch
  • Red Chilly Powder - 1 tsp
  • Turmeric powder – 1/2 tsp
  • Coriander powder - 1 tsp
  • Salt - to taste
  • Oil - 2 tablespoon 


Method of making Fish Curry:

Making of Indian Fish Curry


  • Clean the fish, wash and cut into small chunks and keep aside.
  • Mix the dry spices red chilly powder, turmeric powder, coriander powder and salt with some water and make a smooth paste.
  • In the pan roast the black pepper and the cinnamon stick, cool and then crush to form powder.
  • Crush and roughly chop the garlic.
  • Roughly chop the onion and keep aside.
  • In a vessel/wok, put oil and heat it, now add half of the crushed powder of black-pepper and cinnamon stick. Then quickly add roughly chopped garlic.
  • When the garlic turns golden brown, add roughly chopped onion.
  • Let the onion gets cook and turn golden brown, now add rest of the crushed black-pepper and cinnamon stick.
  • Now add the smooth paste of powdered spices and cook for a minute. Keep stirring it.
  • Add little water to avoid the curry, sticking the bottom.
  • Keep cooking for couple of minutes.
  • Now again add some water (around 1cup) depending on how thick you want the curry.
  • Then add the fish pieces into the curry and with the ladle pour some gravy on the pieces and cover the vessel/wok.
  • Simmer the fire and cook with cover/lid for about 10-15 minutes. Let the fish cooks in own steam.
  • Remove from fire and serve hot with rice or roti.  

Note:

  • The Fish-Curry tastes best when the gravy is thick.
  • Roasting the black pepper and cinnamon stick makes it easier to crush and somehow removes any extra bitterness.
  • Making the smooth paste with of the dry spices enhances the cooking.
  • I prefer, Mustard Oil to cook, you might add any oil you wish to.
  • The major role in adding the flavor of the curry is the excessive addition of Garlic, black pepper and cinnamon stick.
  • I loved the Mackerel fish; you might get any fish you like the most.
  • Also, I believe cooking this very ethnic dish cooked in the brass wok enhances fish’s flavor.
  • Make sure never to add anything sour like lemon juice or tomato, when ever cooking anything in the brass wok, because the brass metal might just chemically react with the food.
Read More »