09 September, 2009

Random Nine Photographs

Random 9 pictures on 09.09.09 are in reality not random but exquisite moments of time. I thought to share with you all. These photographs are taken by my dear friends. This is like some kind of celebration of moment. I’m proud to share and am grateful for their contribution of their creative art.

For me taking pictures is no big deal but its all about how you capture and infuse the emotions of the moment. No certified verification needed this only the people with big heart can do!

Photography goes beyond any explanations. It’s an observation where the photographer captures little things which everyone does not notice but the photographs make you see and wonder. A photograph is a way of deep feeling, instant touch and immense urge of love.

I adore the following pictures and the art touches my soul completely. So without more ado, lets start with the saying Picture speaks thousand Words but Picture Speaks Louder than Words”.

These people are not professional photographs but surely they share a pulse of passionate photography.

NOTE: Click on the photographs and view the better and the tiny details of the moment in Enlarged Photographs.

Taj hotel Mumbai @PratyusPatnaik
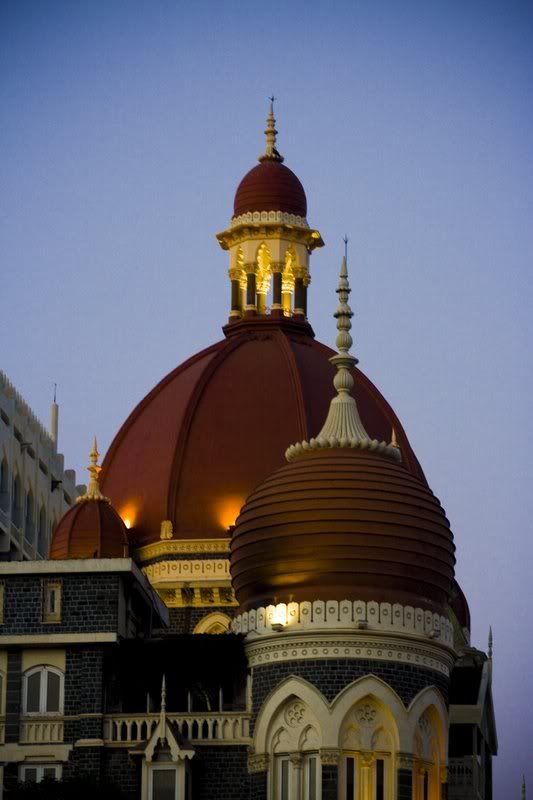
1. Photo Courtesy : Pratyus Patnaik
This photograph is the famous, striking Taj Hotel, the glory of Mumbai. The Taj which stood strong and tall during crises of 26/11. But I believe that this Taj is like a catalyst of unity and happiness of people and this marvelous feeling is well captured in picture. I feel this salient picture has a perfect standards in terms of angle, lights or theme.


Go Green@NitinGurav
2. Photo Courtesy : Nitin Gurav
This picture is taken in Aralgundi, a small village in Maharashtra which is the hometown of Nitin. When, I see this picture I wonder the beautiful little things that Nature offer. Most often such little things with gives us immense happiness gets unnoticed by us. Indeed nature has its own beauty in the imperfect details.


MoonWalk @ AmitSemwal
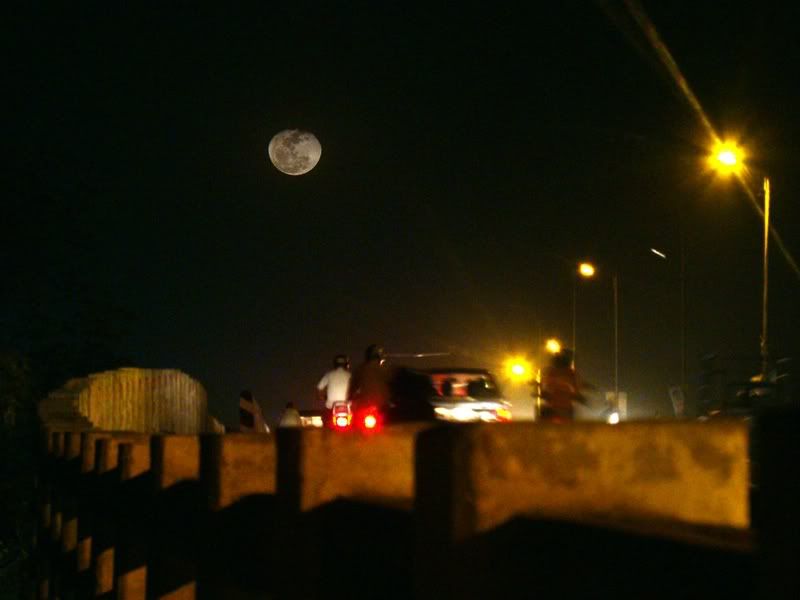
3. Photo Courtesy : Amit Semwal
This photograph is captured at Jaipur,Rajashan. Amit is expert in capturing the very normal pictures but with twist of fantasy. Here, this picture has its own looks and more I could justify in words, it’s like a way from earth to moon. This picture reflects the real essence daily routine ending with the fantasy. Its like a dreamland, and simply adore it.


Bird crown @ShubhamJoshi
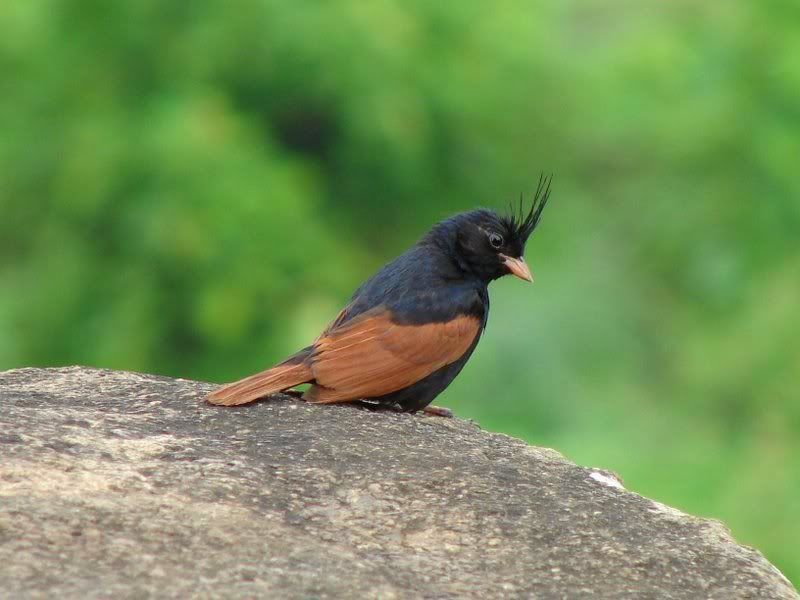
4. Photo Courtesy : Shubham Joshi
Capturing birds and animals is very tough. Either one captures them incidentally or one has to keep waiting and clicking to hold the best of the shot. This picture is taken at Maksi which is situated on Mumbai-Agra highway. I really don’t know the name of the bird but what I know is that this pose of the bird is stunning. Look at the cute crown like feathers over its head. You rock man!


Home Diwali@KabirGoswami
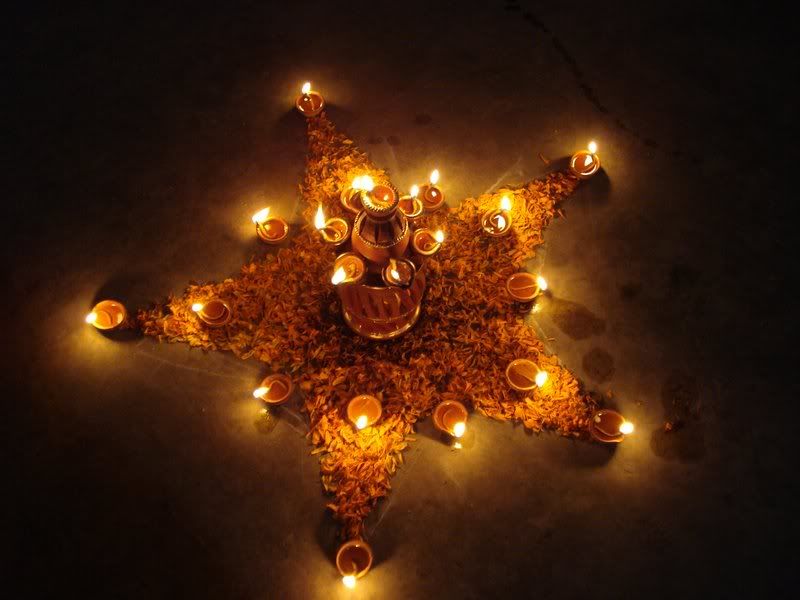
5. Photo Courtesy : Kabir Goswami
As I have believed and mentioned above that taking pictures is no big deal until the picture is infused with the feeling and embraced with passion. This photograph is taken at home celebrating the eve of Diwali festival. Delightful small clay pots, lighten lamps decorated in a Star shape instantly captures attention. It is a pleasing scenic reflecting the hope and happiness. Isn’t it great how something so simple can totally make your day.


Golden Temple@ BharatBathi
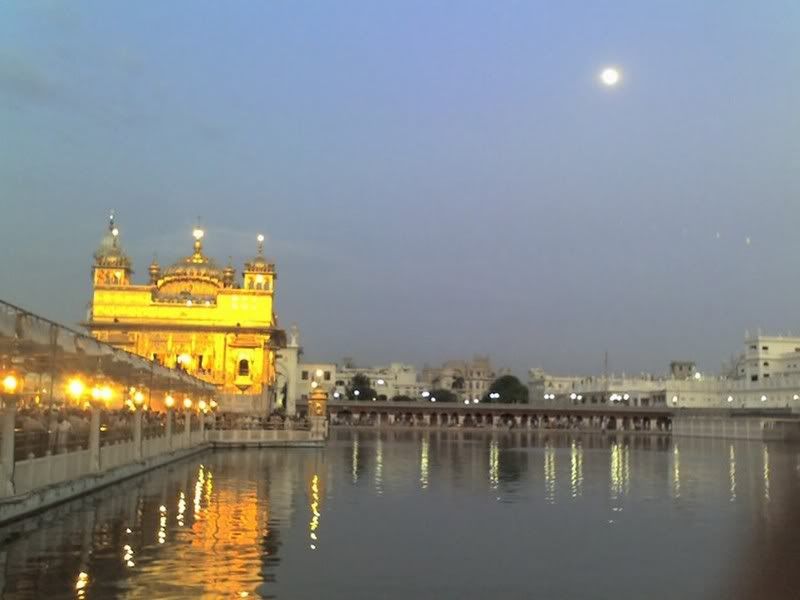
6. Photo Courtesy : Bharat Bathi
This photograph is the famous and magnificent Golden Temple of Amritsar,Punjab. The thrown is made up of real gold. Very well the golden spark of the temple is captured under the bright blue sky. A studded full moon above seems like blessing for the perfect photograph. It’s a fine-looking exquisite momemtum carried in flash of the camera.


Insect@ Sameer
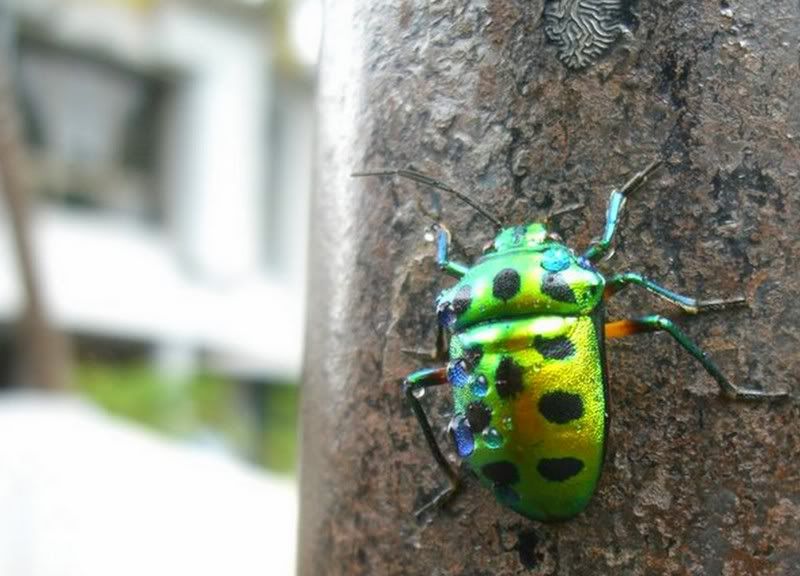
7. Photo Courtesy : Sameer
Capturing insects is very difficult as they do not get still easily. So this photograph reflects the patience. I like the way tiny droplets over the body of the strange insect is captured.Indeed, Moments are for the moment and if captured in the pictures it’s the true colors of time and age.

Daughter Painting@UKS
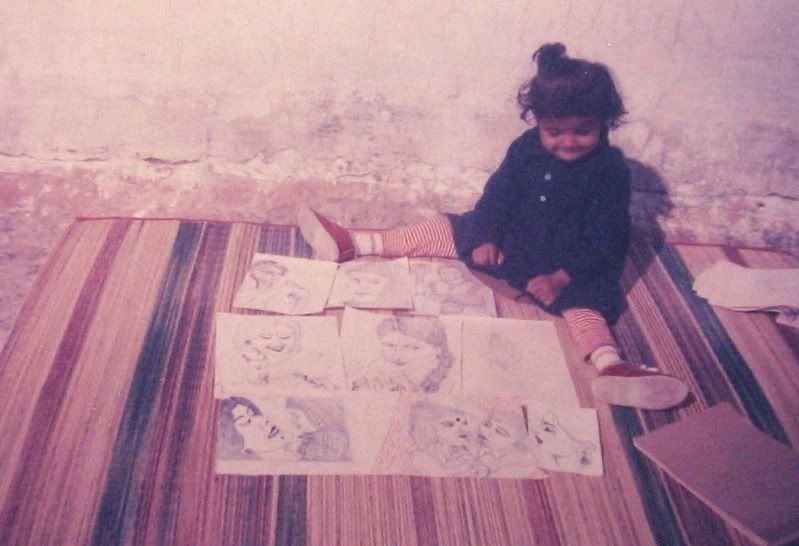
8. Photo Courtesy : UKShakyawar
Emotions are attached with the photographs. This is ME in the photograph taken by my father. The captured moment in the photograph goes back more than 20 years when I was a little chide. Being a very naughty child had torn almost all his sketches from the drawing book. So just before I would destroy more of his art work, he thought to capture the moment with his works. Of coarse this photograph recollects so many moments of my childhood. Above all photographs is all about captivating feelings.

Most Moment@BhupeshKoli
9. Photo Courtesy : Bhupesh Koli
This photograph is taken by Hubby when I was newly married. I find this picture very enchanting. Also it’s a picture that has captured my thoughts just rightly. A little distorted quality of the photographs actually adds value to the aura. Perhaps, that is why sometimes imperfections seem so perfect ;)

NOTE : Request not to void the copyrights of the photographers. These pictures cannot be used anywhere eles without permission.
Read More »

07 September, 2009

my Birthday - age Reminder

Birthdays are always special because people make your feel that. For me completing 9 has been very special as, I knew from now onwards I shall never have that single digit number. And yes! This two/double digit shall always be attached to my age. Then among this double digit, 16 was so interesting. Being in a teenage and often believed the age as the most beautiful time of any girl’s life.

For me the milestone was when I was a certified adult and 18. I could get my driving license and could vote. But sadly 18 is remembered passing out the school. In a way, calling off the childhood days, the fun days.

Of course by then with the growing up phenomenon I was clearly aware that asking a woman her age was a serious crime. It’s almost like looking inside the purse of a girl without her knowledge or almost like going beyond her dignity. Next I considered my 25 as the most special on of all, as believed it was like celebrating my Silver Jubilee of life.

I am today 26 find it a genetic blessing that even today people sometimes asking me which school/college do I study. I eat whatever I want without any significant weight gain and no subject of verification still look the same as I was years back. Hence, so far had no problem in answering the questions asked about the Age. Perhaps, I wish to feel same (Happy) even when I am at 30, 35 or at 52.

Here, I wish and hope in coming years, I am much careless about the number of the grey hairs or wrinkles on my face. As they to be believed signs of experience, pride moments, the rich journey of celebrations I made throughout the life span. Sometimes, there are people may not want to acknowledge the new age, they like to remain young. But then how can one forget the quote of the famous artist, Pablo Picasso that "It takes along time to Grow Young".
I’m born on 07th September, 1983. How old am I today..?
And a reply comes “As old as you feel.” Or “16 does that makes you happy..huh..”
Nostalgia isn't strictly an age thing. Like, when I say “I wish, I was 10, 16 or 18 again, it's not just the age, I want to be back in the Time-Period where I was that old too.”

Perhaps this is the reason, I keep in touch with some of mine childhood, school days, college days friends as it’s only those people who knew me how I was in certain age and know my experiences, turning points the best, which certainly have brought changes into my life and thoughts.

Blowing out the candles from the cake has been the most important act of the day. "I won't forget the chocolate cake," my chachu(uncle) brought in my childhood, whose sweet divine strong smell still lingers my mind till date. Such chocolate cake reminds me of my young age…Of coarse I’m not that old but yeah! It reminds me of much younger times :)

Yet, this is the reason I say sometimes, just sometimes, a number is truly just a number.
Happy Birthday ME..
Read More »

03 September, 2009

Rajasthani Gatte ki sabzi Recipe - Closet Cooking with mummy

Rajasthan is one of the most popular travel destinations in India. It is believed that every third foreign tourist visiting India makes sure to travel Rajasthan.

Historical Monuments, Palaces, Lakes, Forts, sun, sand, colorful Turbans of man, long colorful Skirts of woman, arts and crafts, Camels, elephants, monkey, tiger, warm hospitality are the bench mark in the  Indian Tourism and is famous world-wide. Rajasthan retains it's glory and richness of marvelous history, colourful traditions and its very own spicy delicacies of varied cuisine. Rajasthani meal served with dollops of love and ghee(clarified butter), makes a success story everywhere.

It is the; Royal Rajasthani Cuisine which has still maintained its own beauty and authenticity of the recipes over the generations. Gram flour (besan/chickpeas flour) is one of the major ingredients and is used to make many of the delicacies.
Over centuries to titillate the palate with Rajasthan's exotic styles of cooking recipes and dishes, there is one nourishing Besan ke gatte dish which has retained it's own unique culinary art and classic flavour.
Rajasthani Besan ke Gatte

I’m glad that this recipe comes directly from My mother and infact it is she who is making the dish. As she was making the dish following a certain way, I observed and realized that the recipe is very easy and above all only basic species which one can always find in an Indian Kitchen. So heres from mom, a mouth-watering, closet cooking of the authentic Royal Rajasthani Besan ke Gatte recipe.
  • Serves 4-5 pax easily:
IngredientsIngredients for Gatta :
  • Besan (bengal gram flour) – 200 Grms/2cups
  • Red chilli powder – 1teaspoon
  • Turmeric Powder – ½ teaspoon
  • Hing Powder(asafoetida) – one pinch
  • Wheat flour – For Dusting
  • Salt to taste
  • You will also need one chop-stick.
  •  Oil for frying gattes.
Ingredients for Gravy :
  • Ghee/oil - 2 tablespoon
  • Red Chilli Powder- 1teaspoon
  • Dry Coriander powder- 1 teaspoon
  • Cumin Seed powder – ½ teaspoon (optional)
  • Hing Powder (asafoetida) - 1Pinch
  • Salt to Taste
  • Coriander leaves – to garnish

Method to make Gatte :

Making Besan ke Gatte 1
  • In the bowl take besan(chickpeas flour), red chilli powder, turmeric powder, hing and salt.
  • Mix it well and now add water in the mixture to make smooth-stiff dough. Add water slowly.
  • Take whole dough and divide into small equal portions to make round balls.
  • Now dust a bit of wheat flour and roll the dough with the rolling pin.
  • Let the dough ball turns flat like any other roti/chapatti or Indian bread.
  • Now again dust a bit of wheat flour and keep the chop-stick at the corner of the flat dough rolls about 5-6 inches long.
  • Now start rolling around the dough and let the chopstick be in the middle.
  • Slowly pull the chop-stick out of the rolled dough.
  • Do the same process with all other dough balls.

Making Besan ke Gatte 2

  • Now boil the water in the deep pan.
  • When the water starts boiling add all the rolled dough sticks/rolls with the hole in between.
  • Boil them for about 6-7 minutes.
  • Check one by pressing in between the fingers.
  • When they are perfectly done they will turn tight and quite solid/stiff/hard in texture.
  • After they are done, strain the gattes and keep aside to cool.
  • Also store the boiled water used, for latter adding in the gravy.
  • Then take the strained gatte sticks/rolls and cut into small pieces around 1inch in thickness using knife.
Method of making Gravy for Gatte :

Making Besan ke Gatte 3
  • Take a small bowl and mix to make a smooth paste with water and the dry powdered spices like coriander powder, red chilli powder, salt and turmeric.
  • Now add ghee/oil in the pan and heat it.
  • Now take those small pieces of the roll of the gates and fry them until they turn a bit reddish-brown in color. Take them out on the oil soaking towel.
  • Now take the same pan and remove any extra oil is there.
  • Then add cumin seeds (jeera) in the heated oil. Also add a pinch of hing into it. ]
  • After few seconds add back the reddish-brown fried gates and followed by the paste of species made with water and kept aside. Keep stirring it on high flame for couple of minutes.
  • Now add sufficient water to the pan. Let the gattes get soaked inside the pan.
  • Simmer the flame and let it cook in their own juices, around 12-15 minutes. Do not stir hard now, as the gattes might break. Be gentle and stir only ones.
  • Later the gravy shall turn thick. Royal Besan ke Gatte ki sabji is ready.
  • To garnish sprinkle some fine chopped green coriander leaves before serving with bread/chapatti/paratha/puri/rice.
Note:
  • When (in making dough and gravy) add water, very slowly and carefully.
  • Some people also like adding curd to the gravy but I like it simply.
  • Hing powder (asafoetida), helps to enhance the flavour of the dish.
  • No ginger, garlic or onion is used in this recipe.
  • Using the chop-stick is optional to make hole in the middle of the gates. One can directly and softly roll it and then cut into small pieces. But I like the other way round as this allow the gattes absorb gravy verywell, making it tastes better and juicy. You will surely find a difference!
  • The Picture below capturing the Rajasthan Touch is taken by Amit Semwal, who always incredibely captures the soul of the people with it's own very unique way to uplift the aura. Thanks! Buddy for the Picture.
Rajasthan Touch @ AmitSemwal
Read More »

11 August, 2009

Legume Love Affair - black chickpeas curry

The Chickpea belongs to legume family. Legume refers to the seeds of certain plants, a simple dry fruit which are low-fat, low-cholesterol substitute for meat. Chickpeas are high in protein and are one of the earliest cultivated vegetables. 7,500-year-old remains have been found in the Middle East.

Believe it or not but in 1793 ground roast chickpeas were noted by a German writer as a coffee substitute in Europe and in the First World War they were grown for this in some areas of Germany. Chickpeas are still sometimes brewed instead of coffee. [wikipedia]

For me chickpeas reminds me of my school days when in third standard, my science teacher told us to grow a plant in the small pot as an assignment for learning the growth and parts of the plant. I used to take a small ice-cream plastic bowl to plant chickpeas seeds in it. India is the world leader in chickpea (bengal gram) production.

Black Chickpeas Curry


There are two main kinds of chickpea:
  • Black Chickpeas (Desi / Kala Chana), which has small, darker seeds and a rough coat, cultivated mostly in the Indian subcontinent, Ethiopia, Mexico, and Iran.
  • Kabuli Chana(Chole/garbanzo beans), which has lighter colored, larger seeds and a smoother coat, mainly grown in Southern Europe, Northern Africa, Afghanistan, and Chile, also introduced during the 18th century to the Indian subcontinent
Usually, people like eating the Black chickpeas (desi/kale chane) in breakfast or as some evening snack cooked which have a very basic recipe that is boiling them till soft and then in very little oil slightly sautéing those with fine chopped onion, some seasonings and mixed with a tint of lemon juice.

I prefer a step further, cooking black chickpeas (desi/kale chane) as in a Curry. When one does not have any green vegetables in stock, these legumes are the best and easiest options to cook in the earthy delicacy.


Ingredients of Black-Chickpeas Curry:

  • Kala Chana CurryOnion-1 (chopped medium size)
  • Tomatos-2 (large size)
  • Green chillies-2-3Nos (optional)
  • Coriander Powder-1 tablespoon
  • Red Chilies Powder-1 teaspoon
  • Turmeric Powder- ½ teaspoon
  • Cinnamon Stick-1/4 inch
  • Black pepper-6-7Nos
  • Cloves- 2-3 Nos.
  • Salt- According to taste
  • Ginger-1inch
  • Garlic pods-6-8 Nos.
  • Oil- 3tablespoon.

Making of  Black Chickpeas Curry:

Making of Black Chickpeas Curry

  • Wash and soak the black chickpeas (kale chane) in water for at least 6-10hours or overnight. Rinse the chickpeas and keep side.
  • Dry roast the cinnamon stick and black pepper on the hot pan. Cool it and then crush to make them powder.
  • Either take ginger-garlic paste directly or make one by crushing them together to form paste and mix the dry roasted cinnamon stick and black pepper powder.
  • Fine chop the Onion and tomatoes.
  • Take other dry spices like turmeric, salt, red chilies and coriander powder in the bowl and mix to make paste texture with water.
  • Now, take a Pressure Cooker and heat oil in it.
  • Then add the cloves and following it add tomatoes.
  • Cook the tomatoes till glossy.
  • Now add fine chopped onion and cook till the onion turns golden brown.
  • Now add the ginger-garlic paste mixed with roasted cinnamon stick and black pepper powder.
  • Cook for next 2 minutes. Then add the spices (coriander, chili, turmeric powder and salt) paste made.
  • Mix all together well and cook until it turns golden color and leaves oil from the mixture.
  • To avoid the spices sticking at the bottom add ½ cup of water.
  • Now add the over-night soaked black-chickpeas into the vessel and mix it well with the spices.
  • Keep the high flames keeping stirring and roasting the black-chickpeas with the spices for next 5-10 minutes.
  • Now add chopped green chilies and 4-5 cups of water.
  • Close the pressure cooker with the lid and cooking until 8-10 whistles.
  • After all whistles done cover the vessel/cooker and let the smoke mixes well.
  • Check the consistency, simmer till required consistency. Also check pressing one of the chickpeas have turned soft. Add more water if required and boil.
  • Keep on rest for couple of minutes. Garnish with coriander leaves or fine shred of ginger.
  • Serve hot. Enjoy with warm rice or chapatti/bread.
Note:
  • Black Chickpeas LegumeYou can boil the black-chickpeas separately until soft and also one can use the same water in which chickpeas boiled to make curry.
  • One can also use ginger garlic paste.
  • Paste of onion and tomato can be used.
  • To enhance taste on can add the lemon-juice at the end before serving.
  • Better to use the pressure cooker than a normal pan, as it saves time and fuel.
  • The number of whistles in pressure cooker might differ. So if you are not sure then, after every 3-4 whistles open the pressure cooker and do check the chickpea have turned soft.To check, take one chickpea and press in between with fingers.
  • This recipe is also dedicated to the wonderful competition "My Legume Love Affair14" hosted by Susan,"The Well-Seasoned Cook" Blog.
Read More »

06 August, 2009

my first car - Black Beauty

...it is not Car
I was driving
but it is..
The CAR
that drives me crazy...

My First CAR
It is not Car I was driving but it is The Car that drives me crazy..
Well Last month July,09  had been very hectic as well as very special for me and my family. It was the time of  I was celebrating happily my 2nd Anniversary of Marriage on 23rd July. The month passed eagerly waiting for our very New first Car to come home.

From past one year, I and my Hubby have been looking for the perfect car for us. We have been to almost all the showroom in the town looking to one and all models and brands of cars. Infact, my Hubby could get a PhD on cars, as he had been going through all the details and history on cars and brands ;)

Car recollects so many memories of life. I still remember when my father in early 80’s bought his first car, Fiat-Premier Padmini. More than a passion it was a complete pride to owe it. Most of the kilometers I have earned have been in traveling Fiat. It was a big car, accommodating many people at the same time.

That Emerald green Fiat Car with us attended most of the Marriage Ceremony of that time in my family. My father later got so much addicted to drive fiat that it was very difficult for him to change the car and switch to any new one. He didn’t mind if his colleges and friends by that time had already switched to their third car. Now, this is what I call a definite craze, passion and love for the first car.

Finally, after lots of push, he agreed to have his second car, TATA IndicaDLS. Indica is still intact in the current market and holding the strong position because of being small yet spacious diesel car, with great mileage chart and absolutely negligible maintenance.

For me both these cars are very special, as it was Fiat on which I tried my hand first to drive and learnt a basic and Indica is one which certified me as a learned in driving. "In family, my parents of their generation were the first one to posses the car. And this gives me an immense pride and pleasure to believe that to my generation, it’s again us who have got our car first in our family."

I have been a very loyal customer and have always trusted and adored the brand Fiat and TATA, so I had more inclination towards the cars offered by them.

As, this was going to be our first car and I thought to go with the trend, having a small car and we got plenty of choices to make like i10, i20 and Getz from Hyundai, Chevrolet’s first small car in India Aveo UVA, Skoda Fabia and Honda Jazz are also nice. Not to offend anybody choice but the small cars from the most popular brand in India, Maruti Suzuki’s cars like A-star, Ritz, Splash, and Swift were never in the race for us to choose. Many other brands were also supposed to launch new small cars but were not fixed. We (Hubby and ME) had almost decided the Indica Vista a new improved version of Indica became our first choice, infact was almost finalized it.

Just a day before the booking we saw in newspaper that Punto got launched. My Hubby just fell in love with the car. Apparently, one is not supposed to fall in love with a car until one drives and buys it. But He fell in love with the picture in the newspaper. My hubby with his friends went the same TATA showroom which is also collaborated with Fiat to see Punto. They saw the car, and simply fell in love with it.

I was also eager to see the world renowned and highly appreciated car. So in the weekend, we went together to see Punto, had a 15 minutes test-drive. The next I remember having twinkles in eyes and simply booked it!! It is as simple as that. Seems, like the wait for a year was completely worth. Fiat-Grande Punto Emotion in Hip Hop Black, was best and easy choice to make. It was exactly what we wanted and waited more. This small car features is no less than any other big car.

My Punto

We thought and expected the delivery of the car on our anniversary date but it took a week more and on 30th July afternoon, the dealer asked us for the pick up of the car. The time we were about to leave for pick up, it started raining heavily, so we decided to have it next day. We were so excited and eager to bring Grande Punto at home, next morning on 31st July, 2009. And what a pride, ride, leisure, pleasure and luxury it is to posses Punto.

Punto word if translated in Italian and Spanish languages means a point or hit.
The list of things that hit me crazy about Punto is as follows:
  • It’s our First Car. It is world-wide famous and comes from my favorite brand Fiat.
  • Though listed in small cars, it is very spacious and has stunning looks with world renowned performance.
  • It has automatic indicators and reminders for every simple and little thing, like it beeps and shows in written if seat belts not put or boot space is open. The doors get locked automatic after 100 meters drive.
  • This car also has the best Blaupunkt music system.
  • Many of the setting can be done through the manual buttons on the steering wheel.
  • This car has its strong alloy wheels and much thicker and bigger tubeless tyres.
  •  And most important it also has inbuilt Microsoft software in partnership with Fiat used inside the car known as Blue&Me. This system offers Bluetooth and USB connectivity to mobile phones and personal media players. It also provides a hands-free system, allowing you to control all features by voice commands. One can also their mobile phone.
  • Also this car has EcoDrive, a new service component which offers the ability to track driving efficiency. It collects data about CO2 emissions and fuel consumptions by saving them to a USB key, which can then be connected to a PC and analyzed.
  • It posses the most powerful engines have electronic stability program and anti slip regulation fitted. These egines are also environment friendly and Euro 4 ready. This  car is well equipped with safety system ABS(Anti-Lock Braking System), Power Steering and windows.
  • And most important, The Grande Punto was awarded with 5 stars in the EuroNCAP crash test for passenger protection and Euro NCAP 3 star certification for pedestrian safety.
  • And did you see this Punto Symbol written at the back of the car looks so cute and  P word is written in such a manner as if a man is sitting the car inside in the most comfortable position, holding the steering wheel.  

Happy Punto

I hope to every mile WE spend with this Punto, the Black Beauty multiples the Smile:)
Read More »

12 July, 2009

Healthy Food - Mix of Lentils

Dal or lentils is the staple food in every Indian home. Lentils, you'll find in almost every Indian kitchen. For the vegetarian, lentils are the complete delight diet as a common source of high protein. Lentils are boiled to a stew-like consistency seasoned with a mixture of spices. In some recipes, the lentils are boiled with vegetables and know as rasam and sambhar.

South India has recipes of rasam and sambhar where the lentils are boiled with vegetables. In India, each region has its own favorites and cooking methods of lentils. I’m here sharing my home recipe for the “Mix of lentils”. The Split Black lentils (Urad dal) is the main lentil mixed with the other lentils like toor/arhar dal (yellow lentils/pigeon pea) and chana dal (Split Chickpeas), tempering with garlic. The best combination for a healthy diet this recipe has, that it has low fat and high protein.


This recipe is quick to make and being high in protein, simply very deliciously healthy to relish. Also adding this recipe today, have a genuine reason as this is my Paa’s favorite dish and today is his Birthday too. So here's wishing Happy Birthday Paa! Enjoy!!

Serves easily 2 Pax:
Ingredients for Recipe:
Ingredients

  • Split Black Lentils(Kali dal with cover) - ½ cup
  • Split Chickpeas(Gram/Chana dal) lentils – ¼ cup
  • Yellow(Arhar/Toor dal)Lentils – ¼ cup
  • Garlc Flakes – 4-5Nos.
  • Green Chilli- 1 Nos.
  • Salt - 1 teaspoon (according to taste)
  • Turmeric - 1/4 teaspoon
  • Red chilli Powder- ½ teaspoon
  • Coriander Power- ½ teaspoon
  • Ghee (clarified butter) - 2 teaspoons
  • Water- to pressure cook/boil.


Making of the recipe:
  • Measure the lentils in the cup and wash in water for a couple of times. And keep aside rinsing it.
  • Chop the green chili roughly.
  • Now take water (around 2-3 cups) in the pressure cooker and add the lentils.
  • Also add the chopped green chili and other all dry spices with salt into it. Mix it well.
  • Now cover the pressure cooker, and cook for 2-3 whistle.
  • When the whistles are done, open the cooker and check the lentils are cooked. The lentils must look cooked and soft. To check take a gram lentil in hand and press to find it soft in texture. If not done, cover it and let one more whistle.
  • In the mean time, cut finely the garlic flakes for tempering.
  • Take a ladle or pan for tempering. Heat it; add ghee and then the fine chopped garlic flakes.
  • Let the garlic turn golden brown. Quickly add this golden brown garlic into the dal (lentils) prepared. Cover with the lid, the vessel/cooker and let the smoke mixes well with the lentils. Keep on rest for couple of minutes.
  • Serve hot. Enjoy with warm rice or chapati and pickle as side dish. 

NOTE:
  • You can soak the lentils in the water for 10-15 minutes prior cooking.
  • Ghee must be used. Substitute is Butter.
  • I have also added just ¼ cup of Urad dal gives smoothness to the Dal. Of coarse it is optional.
  • Also I love the Toor/Arhar Dal so I have added it you might skip it. But adding it will only add on the protein so no worries :)
  • After the dal/lentils are cooked and before tempering, you may also just a bit mash the dal/lentils with the laddle so that the juices of different dals/lentils mix up well.
  • But definitely in this particular recipe of Black Dal, the tempering must be done of the garlic.
  • If you don’t have a pressure cooker, then a small vessel can be used to cook.
  • Keeping this recipe in the thick texture add more flavor. So use the water accordingly.
Read More »

07 July, 2009

Fish Curry - Cook Like Grandmother


Everything you need to turn your kitchen into a paradise lies in from ingredients, to spices, to gadgets, to utensils. Yes! Right kind of the utensils and vessels plays a vital role in the comfortable cooking of any cuisines. Cooking Indian cuisines, the best works is the Indian Wok. Somehow, the design and shape of the Indian Wok have not changed over centuries.
My mom liked to cook her food in the wok made of real Iron Metal which looks dark and strong and often changes the color of the food cooked in.

Cook like Grandma, the Fish Curry

I also have my non-stick woks to stainless-steel woks but I believe that my very own traditional Indian Wok (Kadhai) made from brass metal is the best. This was gifted by my mother-in-law, who always prefers to make food in the brass wok. This wok has hemispherical in shape with no flat spot on the bottom. Their handles are two large round rings that stick almost straight up. It’s bottom which makes for quicker and more even distribution of heat. The design makes them ideal for cooking over a fire. A bright golden wok with tints of traditional circular design makes it look so special and graceful.

My Golden Wok

I made my very traditional Indian fish curry in this brass wok which tasted so wonderful. Cooking fish hardly takes 10-15minute, making it the simplest dish. I like making fish curry in the Bengali style with panch-phoran species or like Patrani-Machi from Gujarat which is cooked with steam, but the most I love is the one which have the recipe directly from my Grandmother. This fish curry is made the same way as my grandmother cooked. It is easy, spicy, and extremely delicious with ethnic rough gravy makes it taste like a complete divine recipe. Very few but specific species cooked in the Indian traditional wok makes this recipe a sure delight to relish eating.

Recipe for 2 pax:
Ingredients for Fish Curry
    Ingredients
  • Fresh Fish (Indian Mackerel)
  • Onion - one (medium size)
  • Garlic – 2 full pods(around half cup)
  • Black Pepper – 1 tsp(around 10-15)
  • Cinnamon Stick – 1inch
  • Red Chilly Powder - 1 tsp
  • Turmeric powder – 1/2 tsp
  • Coriander powder - 1 tsp
  • Salt - to taste
  • Oil - 2 tablespoon 


Method of making Fish Curry:

Making of Indian Fish Curry


  • Clean the fish, wash and cut into small chunks and keep aside.
  • Mix the dry spices red chilly powder, turmeric powder, coriander powder and salt with some water and make a smooth paste.
  • In the pan roast the black pepper and the cinnamon stick, cool and then crush to form powder.
  • Crush and roughly chop the garlic.
  • Roughly chop the onion and keep aside.
  • In a vessel/wok, put oil and heat it, now add half of the crushed powder of black-pepper and cinnamon stick. Then quickly add roughly chopped garlic.
  • When the garlic turns golden brown, add roughly chopped onion.
  • Let the onion gets cook and turn golden brown, now add rest of the crushed black-pepper and cinnamon stick.
  • Now add the smooth paste of powdered spices and cook for a minute. Keep stirring it.
  • Add little water to avoid the curry, sticking the bottom.
  • Keep cooking for couple of minutes.
  • Now again add some water (around 1cup) depending on how thick you want the curry.
  • Then add the fish pieces into the curry and with the ladle pour some gravy on the pieces and cover the vessel/wok.
  • Simmer the fire and cook with cover/lid for about 10-15 minutes. Let the fish cooks in own steam.
  • Remove from fire and serve hot with rice or roti.  

Note:

  • The Fish-Curry tastes best when the gravy is thick.
  • Roasting the black pepper and cinnamon stick makes it easier to crush and somehow removes any extra bitterness.
  • Making the smooth paste with of the dry spices enhances the cooking.
  • I prefer, Mustard Oil to cook, you might add any oil you wish to.
  • The major role in adding the flavor of the curry is the excessive addition of Garlic, black pepper and cinnamon stick.
  • I loved the Mackerel fish; you might get any fish you like the most.
  • Also, I believe cooking this very ethnic dish cooked in the brass wok enhances fish’s flavor.
  • Make sure never to add anything sour like lemon juice or tomato, when ever cooking anything in the brass wok, because the brass metal might just chemically react with the food.
Read More »

30 June, 2009

Bourbon Biscuits - Homemade Heaven

Countdown Begins ~ Count 23

...Bourbon Biscuits spells out the
Chocolate
the
Celebration
The two rectangular pieces of chocolate brown biscuits. The chocolate filling, the middle layer is like the glue that holds the two rectangular pieces of biscuits together. Colour wise, the biscuits are slightly lighter and the filling slightly darker. Each biscuit with ten holes arranged in five pairs on outer surface breathing. The biscuits has little sugar crystals sprinkled on the upper surface which counts as extras.  Yes! It is the deliciously darling the best the Bourbon Biscuit.


I'm too fond of only chocolate bourbon biscuit, – though I'm  not sure why, exactly. Perhaps, maybe it has to do something with my body sugar that rushes whenever I eat Bourbon biscuit. Making me feel rejuvenated in a micro second. Indeed its like having a Heaven in my mouth with every little Bites of Bourbon Biscuits..Yummm...!
I have been a strict regular bourbon biscuit eater ever since my childhood. "Perhaps perfectly proven possible way to eat Bourbon Biscuits in the deconstruction list manner that is consuming the separated layers of the biscuits and digging all the fillings inside it."

During my childhood, knowing my fondness for the bourbon, my dear Paa used to bring a whole big tin of bourbon biscuits. My mom used to ask me to eat three biscuits each day as she knew it is simply impossible to stop eating bourbon ones you start. I obeyed the instructions but as always with some changes in the rules. I for sure ate three biscuits as per instructions but at least four times a day. And even this is not just enough for me. I still follow the same rule for the bourbon. Ones the bourbon packet is open it has to be finished..!

But I’m more excited as I recently made my very own favorite bourbon biscuits at home. Except the process of baking, which takes less than 15minutes this one is an easiest sweet stuff to make. My homemade bourbon biscuits taste likes the ones from the shop. I’m sure you will enjoy making and eating it. .

Ingredients for Bourbon Biscuits:
Ingredients for Bourbon Biscuits
  • All Purpose Flour/Maida – 1 cup
  • Butter – ¼ cup
  • Sugar – 1/3 cup
  • Baking Soda – 1/4tsp
  • Baking Powder – 1 tsp
  • Cocoa – 3 tsp
  • Vanilla Essence – 2tsp
  • Cold milk – 3-4 tbsp
  • Honey – 1tsp(optional)
Ingredients for the Filling (Butter icing):
  • Butter – 1/4cup
  • Icing Sugar – 1/3 cup
  • Cocoa – 1 tsp
  • Vanilla Essence – a few drops


Method for making bourbon biscuit:

making Bourbon
  • Take a bowl and add the butter and sugar and beat them till light and fluffy.
  • Add vanilla essence, honey and Baking Soda and blend well.
  • Sieve the Flour with Cocoa and baking powder. Mix the Flour to the creamed mixture and form soft dough.
  • Now, add cold milk to this dough. Roll out the prepared dough on a board.
  • Cut with a biscuit cutter in shape.
  • Prick on top of the cut shapes with a toothpick and sprinkle sugar.
  • Place on a greased and floured baking tray and bake at 160C for 10-15 mins.
  • Cool it for 2mins before using the filling/icing.
Method for the filling:
  • Mix all the filling ingredients to a smooth paste.
  • Sandwich the biscuits with this chocolate butter icing.
Note:
  • Castor Sugar is prefered in this recipe.
  • While rolling the prepared dough on a board  use a little flour for dusting, so that the dough does not stick at the bottom.
  • I made rectangle shapes with the knife and other round shape with the biscuit cutter.
  • In the baking tray, you may also use butter-paper.
  • This recipe shall make around 14-16 bourbon biscuits all together.
  • To enhance the flavor of the filling/icing of the biscuits, you may add 1 tsp coffee essence or 1/2 tsp instant coffee dissolved in 1 tsp water.
  • Countdown Begins-Celebrate Life , COUNT~23 with the Bourbon Biscuits.


Read More »

26 June, 2009

Hubby Style - Taro/Arbi Masala Fry

Yes! My hubby cooks. And what an irony! He can cook all that I can’t. Infact, he loves all those vegetables which I don’t like very much to eat. However when, he cooks anything like that, he somehow convinces me to taste it and then I end up just appreciating his cooking skills. Indeed, he is really good cook. It’s usually the weekends when he innovates and rejuvenates in kitchen making something.

Last Sunday he tried his hand in making arbi/arvi/taro roots. With almost only the basic spices nothing extra, he made those ugly arbi into hot spicy delicious looking recipe. And when asked for the name of the recipe, he in a very lavishing loud way said, it is “Arvi Masala Fry”.

He is quite fussy in adding the specific spices. This excessive attention creates his own very personal homely tastes in anything he cooks.
Like me, He also does not like anybody entering the kitchen and interrupting him when he is cooking. Despite that, I somehow managed to take few good pictures to add in this post. This recipe is quite easy to prepare and best part of this recipe is that one who doesn’t like to eat taro roots, will also appreciate the flavor. Hope you will enjoy!

Arbi Masala Fry

So let’s start with some basic facts of taro roots and followed with the recipe directly from hubby.

Taro root is starchy tuber vegetable much like a potato. It has its native to Asia and grown extensively in the Pacific. Taro roots have its estimates in cultivation in wet tropical India before 5000 B.C. In North India, it is called Arvi or Arbi. In Assamese it is called Kosu. In Bengali the root is called gath and the plant is called Kochu. In Kerala, a state in southern India, taro corms are known as Chembu-kizhangu. It is used as a staple food, as a side dish, or as a component in various side dishes.
Recipe “Arvi Masala Fry”:

IngredientsIngredients:
  • Taro Root (arbi): 4-5
  • Ginger-Garlic paste: 1 tsp.
  • Garlic pods: 10-12 nos.
  • Tomato Puree: 1 tablespoon
  • Turmeric powder: 1/4 tsp
  • Chilly powder: 1 tsp
  • Coriander powder: 2 tsp
  • Cumin seeds: 1/4 tsp
  • Salt to taste
  • 2 Tbs oil
  • Red chili flakes for garnish


Prepartion of Arvi MasalaMethod:
  • Boil the taro root in water for about 10-15 minutes until barely tender when pierced with the knife. It should be firm and not too mushy.
  • Then take out of the hot water and cool enough to handle, trim the ends and remove the skin. Cut them into chunks or small cubes.
  • Now deep fry the taro chunks/ cubes until golden brown. Strain them and keep aside.
  • Now take the dry spices powder (coriander, red chili, salt, turmeric) in a small bowl and add the tomato puree and little water to make it a thick paste. Leave it aside.
  • Take the garlic pods, crush them and finely chop them.
  • Than, heat oil in a pan, add the cumin seeds let it spatter.
  • Now add the fine chopped garlic. When, the garlic turn golden brown, add the ginger-garlic paste. Stir it. Cook for a minute and then add the spice paste and let it cook until it leaves the oil.
  • Pour half a cup of water, if spices stick the bottom of the pan.
  • Now add the fried taro chunks /cubes in the pan. Carefully stir them and cook them in low flames until dry and golden brown.
  • Garnish with red chili flakes. Serve with rice or chapati.
NOTE:
  • Boiling the taro roots, reduces the cooking time.
  • Frying the chunks/cubes of the taro roots makes more delicious and a very specific rough taste of the arvi/taro roots is gone.
  • You can also add the fresh lemon juice to enhance the flavors of the gravy.
  • This recipe was made last weekend, you can try this coming weekend :)
Read More »

20 June, 2009

recipe for lazy man - Onion Paratha

Few days back, I was talking to one of my very close friend, and I asked her if she knew any easy dish, that I could make. She suggested me a dish. Now this simple dish, reminded me how my mom too make in the morning for me during my school days. Indeed, sometimes simple dishes can taste so delicious.

Moreover, ever since I made the Methi-thepla and khichiri, many of my friends said that it good to see the recipes which are so easy and quick to make yet tastes delicious. I’m fully charged and want all my still bachelor friends and the guys who’s wife is not at home to make their hands a bit dirty and surprise themselves or their wife with a little of cooking. Of course, cooking is fun and easy if one really puts some thought over it. One of my friends did try his hand making the khichiri recipe; reading my blog and he realized that he can cook but he needs some more good practice in cooking.
As the perfect quote goes, Never leave Hope in dismay, until dismay leaves you”. So, never leave the Hope in cooking even if your kitchen turns into smoke and mess. Believe me, the moment it’s a mess, you will learn from the mistake and next time, the best you will perform ever since then.
That what philosophy works with me, and I end up discovering a new dish. I’m no more scared of cooking rather I enjoy in my own with all the simple and longs recipes. Some recipes, are directly from my mom’s mouth, some through 24/7 brows and some from the mess I make in the kitchen.


Onion Paratha|Indian Bread


So if you are a bachelor or missing your mom's cooking like anything, or you are simply a lazy-man or you are in a hurry and are hungry, you will surely like to go through this very quick and easy recipe and enjoy cooking for either for yourself or your friends. Avoid being lazy and eating a just a burgers or potato chips. You can be lazy still eat healthy by trying this easy and simple recipe. The best part of this recipe is that you will find all the ingredients at home and none of the ingredients which are seasonal. So, enjoy making the Onion Paratha, hitting anytime the corner of the year.

However, what I enjoy the most about the onion paratha, is the combination of the crispiness of the paratha/bread and the sweet crunchy texture of the fine chopped onion in between of every bite I take.
Ingredients for Onion Paratha:
  • Whole wheat flour: 1½ cup (Shall make 6-8 paratha)
  • Onion: 1-2 (finely chopped)
  • Turmeric powder: ¼ teaspoon
  • Red chilly powder: ¼ teaspoon
  • Coriander (dhania) powder: ¼ teaspoon
  • Salt to taste
  • Oil for making parathas
  • Carom (Ajwain) seeds: ½ teaspoon
  • Anise seeds (Choti Saunf): ½ teaspoon
  • Cumin (jeera) powder: ¼ teaspoon
  • Curd/yogurt: 2 tablespoon (optional)

Making of Onion Paratha

Making of Onion Paratha:
  • Roast the carom, anise, and cumin seed in a pan. Let it cool down and then roughly crush them into powder.
  • Fine chop the onions.
  • Now take the wheat flour, and add the fine chopped onion, with all the spices powder, roasted seeds powder and salt. Mix it well.
  • Add a table spoon of oil. Than add water slowly to knead to make a nice smooth dough. You may use around ½ cup of water. The dough shall be smooth and soft.
  • Cover and leave the dough with a tissue/cloth and set aside for about 5-10 minutes (if in hurry, than no need to set aside)
  • To make paratha/flatbread, divide the dough into balls. Take the size large as of a large lemon. Take a ball, dust with flour and roll out to a flat thin disc.
  • Heat a tava/pan (griddle). When well heated, place a paratha on the tava. Roast on medium flame both sides using the oil. Please refer to the link (Paratha-Indian Bread).
  • Serve hot. Enjoy with roasted green chilies (recipe below.)

Ingredients for Roasted Green chilies:
  • Green chilies: 2-4
  • Salt: 4-5 spoons
  • Oil: 1 tablespoon

Making of Roasted Green Chilies

Method of making roasted Green chilies:
  • Wash the green chilies in water.
  • Now make a long slit in the chili.
  • Ones slit is made de-seed the green chilies. That means, remove all the seeds from the green-chilies with the help of the sharp knife.
  • Now rub the salt outside and inside the green chilies.
  • Leave the green chilies with the salt rubbed for about 10 minutes or more.
  • Than take a small pan and heat oil. Add the green chilies and roast the chilies from both the sides.
  • It will take just a micro second for the green chilies to turn a bit brown. Soon, remove them from the pan and keep aside.
  • Add again the salt on the roasted chilies and serve with the paratha or like any thing as a spicy side dish.

Note:
  • To make the onion paratha, soft, add two tablespoon of curd while making dough.
  • Add the spring onion leaves if available to enhance the taste.
  • Adding the roasted seeds is optional and can add them directly.
  • You might also like to add the gram flour 1tablespoon with the flour while kneading to add flavor.
  • Salt is believed to dilute the strong bitter flavor of the chilies.
  • Add few drops of water, if the green chilies starts burning.(Be careful of the strong smoke)
  • Active your senses and add the ingredients according to your flavor.
Read More »

17 June, 2009

Biryani - a perfect one-dish meal

Few days back, I made Khichiri, the rice preparation which takes no time to prepare. Here is one more rice-preparation, the Chicken Biryani which is quite a lengthy process but totally worth. This makes the perfect one-dish meal which is aromatic delicious and fabulous dish.
Biryani, is a Mughlai dish where the rice is cooked separately from the other ingredients.
The par boiled rice, which is then assembled with the other ingredients, sealed and put on "dum" (put on a very low heat, so that all the flavors inside the pot amalgamate well) for some time.
The good quality of basmati rice used gives the best flavor and appearance. The key to making a good biryani lies in the way you par boil the rice. Never over cook the rice. Most expensive spice used is the saffron. For me the fresh mint leaves creates the magic, for you, any of your favorite other spice can do. Try making it for your loved ones.
Believe me, Making yourself the Biryani and eating it will surely be the most cherishing experience of your life.
This recipe will easily serve 2pax.
So lets us begin.

TOTAL Ingredients for Chicken Biryani:
  • Chicken – 1 Boneless Breast, 2 drum-sticks
  • Basmati rice – 2 Cups
  • Onions - 1 cup (finely chopped)
  • Ginger and Garlic paste - 2 tablespoon
  • Red Chili Powder – 3 tablespoon
  • Turmeric Powder- 2 tablespoon
  • Coriander Powder – 3 tablespoon
  • Bay Leaves - 3-4 Nos.
  • Cloves – 4-5Nos.
  • Cinnamon Sticks- 2 cm long
  • Green Cardamom Pods- 3 or 4 Nos.
  • Black Cardamom Pods- 2Nos
  • Cumin – 1- 2 teaspoon
  • Mace – 2 (full-mace strands).
  • Cashew nuts - 10-12Nos.
  • Raisins- 10-15 Nos.
  • Mint Leaves – 1cup
  • Garam Masala Powder - 2 teaspoon
  • Salt - (according to taste)
  • Ghee (clarified butter) – 3 tablespoon
  • Curd - ½ cup
  • Oil – 5 Tablespoon
  • Saffron - few strands

Chicken Biryani @ Humming Today

For your convenience, the whole recipe of Chicken Biryani is divided into major 4 procedures with picture illustration which is as follows:-
  1. Marinating the Chicken,for making Biryani.
  2. Preparation of the Rice for making Biryani.
  3. Mixing the two sums of ingredients two (1, 2) above,and named as mentioned Making of Biryani
  4. Garnishing, the Biryani.

PROCEDURE: 1.
Marinate Chicken
Ingredients from the above mentioned list; for Marinating the Chicken:

  • Chicken- 1 Boneless Breast, 2 drum-sticks.
  • Ginger and Garlic paste- 1 tablespoon.
  • Red Chili Powder- 1 teaspoon
  • Turmeric Powder- 1teaspoon
  • Coriander Powder- 2 teaspoon
  • Garam-Masala Powder - 1 teaspoon
  • Cloves - 3 Nos.
  • Cumin – 1teaspoon
  • Mace – 1 full-mace strands.
  • Salt- 1½ teaspoon
  • Oil – 1tablespoon
  • Curd - ½ cup 
Preparation for Marinating the Chicken:
  • Take the chicken breast and cut into small pieces. Make cuts on the leg-piece(drum-stick).
  • In a bowl and mix all the ingredients and spicies with the chicken, cover it and keep aside for 1 hour for marinating.

PROCEDURE: 2.

Rice PreparationIngredients from the above mentioned main list, for Rice Preparation:
  • Basmati Rice- 2 Cups
  • Water- 5-6 Cups
  • Oil- 1 tablespoon
  • Bay Leaf- 1Nos.
  • Cloves – 3Nos.
  • Cinnamon Sticks- 1cm long
  • Cardamom Pods- 2 Nos. (crushed)
  • Mace – 1(full-mace strands)
  • Salt- 1tablespoon
Preparation of Rice for Biryani:
  • Take Rice and soak them into water for about ½ an hour. And strain the rice and keep aside.
  • Add 5-6 cups of water with all the spices and set it to boil. Don’t forget to add the Salt.
  • Ones the water starts boiling, add the Soaked Rice. Cook the rice only half done.
  • When rice is half done, remove it from the heat and strain and keep them aside.

PROCEDURE: 3. (combining the 1 and 2)
Making of BiryaniFinal Procedure for Making of Biryani:
  • Take thick bottom Vessel /utensil and heat 3 tablespoon oil.
  • Add the remaining dry spices like cloves, cardamom, bay leaves, mace, cumin seeds, Cinnamon Stick.
  • When the spices start to sputter, add finely chopped onion and let it turns glossy.
  • Add the 2 teaspoon ginger-garlic paste and cook for a minute.
  • Then add the fine chopped tomatoes and let them cook.
  • Mix them well and add other dry powdered spices like coriander, turmeric, red-chili, garam-masala powder and salt.
  • Also add the fine chopped mint leaves.
  • When the spices are cooked, it leaves the oil.
  • Then add the marinated-chicken pieces and ½ a cup of water and cook the chicken with the lid closed. Chicken pieces should look roasted.
  • Keep stirring in between.
  • Ones the chicken is well cooked, check and add ½cup of water if it is very dry or the spices are sticking the bottom. Lower the flame.
  • Now take out half of the chicken in another bowl.
  • Than add the par-cooked Basmati Rice into the vessel/utensil just above the cooked chicken. Spread the rice into a layer. Add only half of the total rice.
  • Now over the rice add the remaining chicken, which was taken aside. Spread on the rice nicely.
  • Also add few thin strands of the ginger in between the layers of the chicken and rice.
  • Latter fill the vessel/utensil with other remaining rice over the chicken and spread. Repeat this process making layers of rice and chicken.
  • Then add over the Rice, (garnishing ingredients metioned below in PROCEDURE.4) the golden fried cashew nuts and raisins with the ghee. Also pour the saffron dissolved -coloured milk over the rice.
  • Close the Vessel/Utensil, with the air-tighten lid. And cook again on the medium-heat for couple of minutes and then on low-heat for 5-10 minutes.
  • After being cooked, don’t open the lid for about 10-15 minutes, let it aroma mix well and settle.
  • Serve hot, with the side-dish like Raita (spices curd) or plain curd, onion rings, and lemon wedge.
PROCEDURE: 4.

Garnish Biryani
Ingredients from the above main list for Garnish in Biryani:
  • Cashew Nuts
  • Raisins
  • Onion (cut into round thin rings)
  • Mint Leaves
  • Saffron (dissolved into warm milk)
Procedures for Making the Garnish for Biryani:
  • Head the ghee in the pan. Fry the cashew nuts till golden brown. Also fry, the Raisins and keep aside in the cup. Add the remaining ghee in the bowl from the pan.
  • Cut in rings of the Onion and keep aside. Take the warm milk, add the strands of saffron and keep aside.


NOTE:
  • You can use all the Ghee (clarified butter) intead of Oil for more aromatic flavor.
  • I prefer the boneless chicken, you can have any piece of Chicken or add mutton pieces as you relish. If vegetarian, you can add the number of vegetables of your choice and follow the same procedure. Marinate the chicken, poking the chicken with the fork and rub the spices. For much flavored marinate the chicken prior 2-3 hours.
  • Keep ready the marinated chicken and the soaked rice ready prior making the biryani.
  • If you are expert you can cook the semi-cooked rice, simultaneously when the chicken is being cooked in the Vessel/Utensil. I prefer cooking one thing at a time for no latter confusion and hassle. Also I keep the semi-cooked rice vessel in the big vessel half filled with the cold water (something like double-boiler pan), so that the rice does not get cooked with the steam while I’m busy preparing the chicken in the Utensil.
  • Keep your garnishing ingredients ready prior starting any main procedure.
  • One can also take a few semi-cooked grains of rice and colour them with diluted saffron for garnishing. One can also add the fresh green coriander leaves every time the mint leaves are added.
  • You will need a utensil of about 12" (300 mm) base, I prefer Pressure Cooker. You can also add the deep fry half the sliced onions to golden brown with ginger strands while layering the rice and chicken.
  • Lid the vessel/utensil and try making it airtight (but no pressure should build up). So one can keep the clean wet kitchen towel covering the opening of the vessel and over it the lid was placed. This shall keep it air-tight. Also you have to take care that the biryani being whole cooked must not get burnt from the bottom after been air-tighten. The flame must not get concentrated only at the center of the vessel after been air-tight; one can keep the vessel on the hot flat-pan/tawa already placed on another burner with the low flame.
Hope you enjoy making and relishing the recipe, the Biryani!
Read More »